Quantcast
Channel: Ekte Lykke

The Daisy Mandala pattern and tutorial

$
0
0

Finally! I have actually finished the pattern and tutorial for The Daisy Mandala!


This project turned out to be so much more timeconsuming than I imagined.
Even though I generally love plans and structure, when it comes to crochet, I'm more a work-it-out-as-you-go kind of girl...
I adjust things along the way, and have become a master of hiding my mistakes,  but when writing a pattern, you can't take the usual shortcuts.....
So, I actually had  to count the stiches, and make sure it all adds up in every round.....

I have counted, adjusted, counted and adjusted and counted again, and now I think (hope!!) I've got it right....

I have not had this pattern tested by anyone else but myself, so if you choose to have a go at it, please let me know if you find any mistakes, or something seems confusing or strange to you.
I apprecitate any feedback, good or bad, so please let me know what you think!

Oh, and if you do make this little Daisy mandala, I would LOVE to see the result!

So, here we go.....

The Daisy Mandala

Note: the pattern is written in US terminology. Below are the terms in both US and UK.

US terms


UK terms

sl st slip stichscsingle crochet
scsingle crochetdcdouble crochet
hdchalf doubel crochethtrhalf treble crochet
dcdouble crochettrtreble crochet
trtreble crochetdtrdouble treble crochet
dtrdouble treble crochettrip tr/trtrtriple treble crochet
rev screverse single crochetrev dcreverse double crochet
yo yarn overyohyarn over hook


Abbreviations: 
ch: chain
hdc: half double crochet
sc: single crochet
sl st: slip stich
htr: half treble crochet
yo: yarn over
Repeat directions between * and * 

Yarnsuggestion: Drops Safran (or any yarn with approx. the same gauge)

Hook: 3,5mm   and 3mm
Number of colors: 7

The Daisy:

I use 2 threads of yarn and hook nr 3,5 to make the daisy in the middle. This makes it a bit “chunkier” and bigger, so it stands out more as a centrepoint of the mandala. If you use only 1 thread, you might have to adjust the a amount of stiches in each round from round 3 to make the mandala nice and neat.
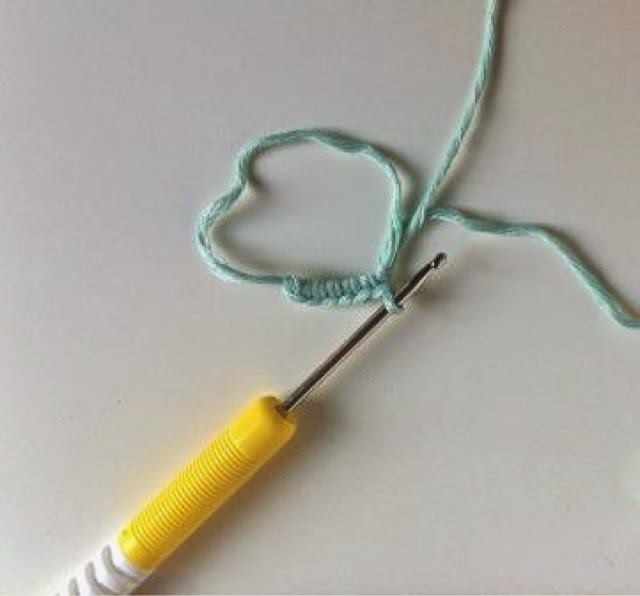

Round 1:

With color 1 (2 threads), make amagic circle
Ch 2 (counts as a hdc). 11 hdc in the ring. Sl st in 3rd ch of beg. ch to join. Pull tailyarn had to close the ring.


Round 2: 

Switch to color 2 (2 threads), and start with a sl stbetween any hdc. Ch 3 (counts as a tr), (2-trpuff st, ch 2, 3-tr puff st) in first space, ch 2, (3-tr puff st, ch 2, 3-tr puff st, ch 2) in each space around. This will give you 12 3-tr puff st (petals) in total. Sl st in the back of first puff to join. Fasten off.


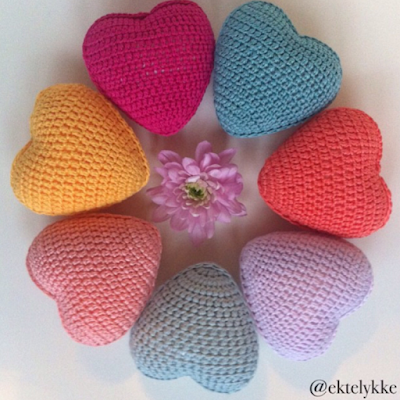
Now you have a pretty little daisy, which will make the centrepoint of your mandala ❤️


Note: The rest of the mandala is made with hook size 3 mm and single thread.
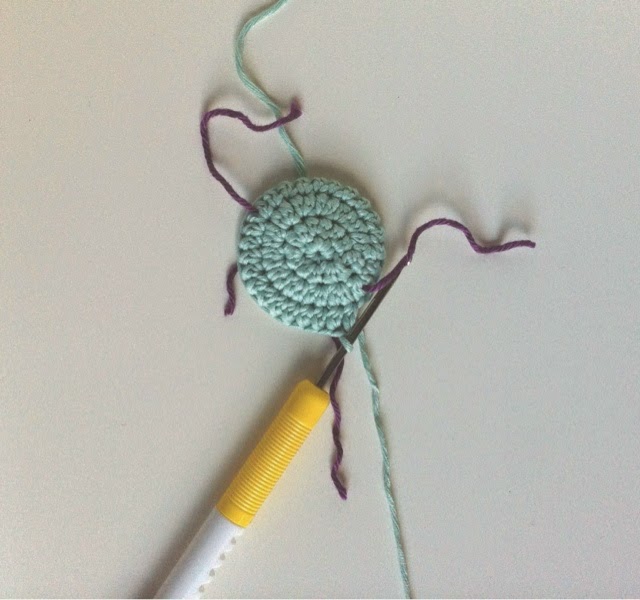

Round 3

Switch to hook size 3 and color 3, start with a sl in any ch-2  space between the 3-tr puff st (petals). Ch 3 (counts as a dc).3 dc in same space. *ch 1. 4 dc in next ch-2 space* around.  Sl st in 3rd ch of beg ch to join. Fasten off.


Round 4: 

Switch to color 4, start with a sl st in any 1 ch space between the 4dc groups.  *ch 5, sc in next space* around. Sl st in the back of the first sc to join. Fasten off. 


Round 5: 

Switch to color 5, start with a sl st in any ch-5 loop, ch 3 (counts as a tr), 2-tr puff st in same loop, (ch 2, 3-tr puff st, ch2, 3-tr puff st) in every ch-5 loop around. Sl st in back of first puff st to join. Fasten off.


Round 6: 

Switch to color 4, start with sl st in any ch-2 space. *ch 3, sc in next ch-2 space* around. Sl st in back of first sc to join. Fasten off.


Round 7:

Switch to color 6, start with sl st in any ch-3 loop. Ch 2 (counts as a hdc), 2 hdc in same loop. *ch1, 3 hdc in next ch-3 loop* around. Sl st in 3rd ch of starting ch to join. Fasten off.


Round 8: 

Switch to color 4, start with sl st in any ch-1 space  *Ch 4, sc in next ch1-space* around. Sl st in back of first sc to join. Fasten off. 


 Round 9: 

Switch to color 7, start with sl st in any ch-4 loop, 1 sc in same loop.*9-dc shell in next ch-4 loop, 1 sc in next ch-4 loop* around. Sl st in back of first sc to join. Fasten off.
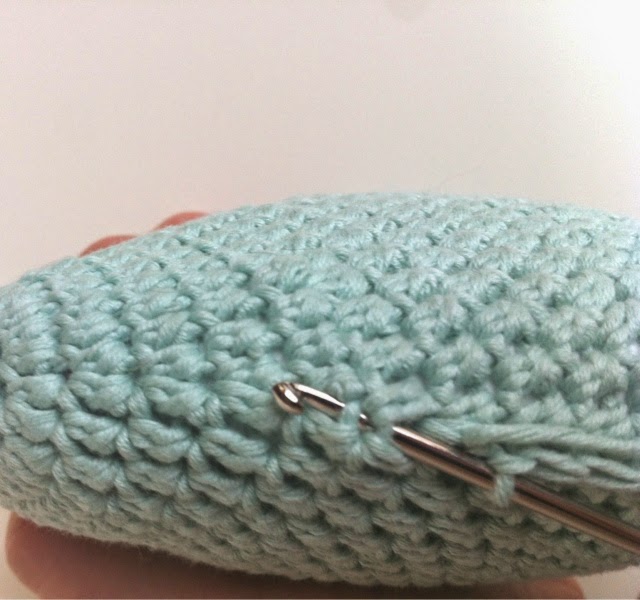

 Round 10:

Switch to color 4, in any 9-dc shell, sl st in the back loop of the 5th dc in shell (see photo), ch 4 *1 hdc on both sides of next sc (sc in the ch-4 loop of the prev row) (see photo), ch4, sl st in the back of the 5th dc in the next 9-dc shell, ch 4* around. Sl st in back of first sl st to join. Fasten off. 

Round 11: 

Switch to color 5, start with sl st in any ch-4 loop after a hdc-2 group. Ch 2 (counts as 1 hdc), 6 hdc in same loop, 7 hdc in the next ch-4 loop * 2 hdc in the top stich of the 2 hdc group, 7 hdc in next ch-4 loop, 7hdc in the next ch-4 loop * around. Sl st in the 3rd ch of the starting chain to join. Fasten off. 
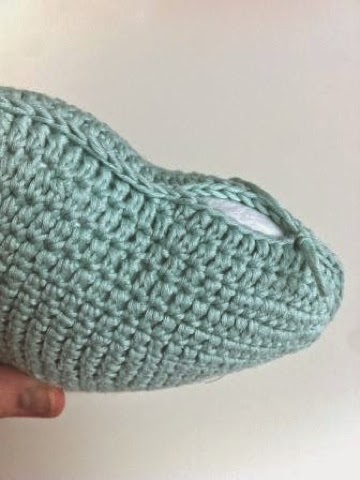


Round 12:

Switch to color 4, start with sl st in any top stich of a 2hdc group (se photo below. The needle points to the starting stich) 1 sc in same st. *ch 3.  sc in 4th hdc* around. Sl st in back of first sc to join. Fasten off.

Round 13:

Switch to color 3, start with sl st in any ch-3 loop, ch 3 (counts as a tr), 4-tr puff st in same loop *ch 2, 5-tr puff st in next ch-3 loop) around. Sl st in back of first sc to join. Fasten off. 


Round 14:

Switch to color 4, start with sl st in any ch-1 space *ch 3, sc in next ch-1 space* around. Sl st in back of first sc to join. Fasten off. 


Round 15:

Switch to color 6, start with sl st in any ch-3 loop, *7-dc shell in next ch-3 loop, sc in next ch-3 loop* around. Sl st in back of first sc to join. Fasten off.

Ta-dah!!! 


                                 ❤️ Live - Love - Laugh ❤️


The Nordic Shawl

$
0
0

Ta-dah!!


My Nordic Shawl from the wonderful My Rose Valley is finished, and I am completely in LOVE with it❤️
This post will be an overload of photos - I got a little carried away there, for a moment....

Here we go, the big Nordic Shawl show-off....:


All ends weaved in, and ready for blocking:


Blocking.... 

It just goes on and on and on....❤️❤️

I'm so happy with my colourscheme ❤️ I tried loads of different alternatives, but finally decided to stick to a warm pallette, and only 4 colours in the border, instead of 6 which the pattern suggests. This gives a more muted and calmer look to it, I think...

(I loved making this so much, so I'm already planning to make another one with a totally different look, and more vibrant colours. A girl  can never have too many shawls, right? )

Ta- dah! My lovely  Nordic Shawl is complete and ready ❤️

Laid out in all it's glory ❤️

Such a lovely border! I really love this pattern ❤️

A perfect match with my favourite Odd Molly dress❤️

Snuggly, warm and luxurious in 100% alpaca 

LOVE ❤️❤️

Facts: 

Yarn: Sandnes Alpakka ( 100% alpaca)
Hook size: 4,5 mm ( a little too big for the yarn, buy I wanted to get a nice and drapy shawl, so the tension had to be a little loose). 3.5 mm on the border.
Pattern: The Nordic Shawl from My Rose Valley. You can buy it here


                                              ❤️Live - Laugh - Love❤️


Beachbag Ta-dah!

$
0
0
Summer is here!! We've spent a much needed long-weekend at our summerhouse, and the weather has been amazing! We're surrounded by clouds of Yellow Broom. The sight and scent are so wonderful ❤️
 I love this place!


A few woderful  days off work, and time to dig out the old sewing machine and start a new project...

I'm welcoming JUNE, the first wonderful summer-month by making myself a HUGE beachbag ❤️

A quite bold project for someone like me, actually...I'm just a wanna-be sewer, and the little I know about sewing is 100% selftaught and has more of a winging-it-as -I-go-along approach, than actually knowing what I'm doing...

My old sewing machine sounds like it is going to take-off and fly away when I step on the pedal, and it keeps stopping all the time, making all kinds of strange and unpleasant noises.......So frustrating! The needle breaks at least 3 times during a session (yes, I'm probably using the wrong size/type of needle, but what do I know?), the threads keep getting all tangled up on the backside, and the stiches are uneven and messy....
All in all, sewing is really a test to my patience, but I so want to be able to do it! There are so many beautiful things I could make if I just mastered this craft!

So, I take the Pippi Longstocking approach: " I have not tried this before, so I'm sure I can do it" ❤️
A great approach to all new challenges in life, I think.

We are going to California this summer (we're leaving in a little more than 2 weeks...eeek!), and for that purpose I think I really need a BIG beachbag, right?
So that is what I bravely and optimisticly set out to make....

I found a great bag in one of my wonderful Tilda books, which did not seem too difficult to make for a newbie


All in all a good plan, and I optimisticly started the quilting. It was so fun and satisfying to quilt these nice Tilda fabrics together. I love the feeling of quilted cotton fabric ❤️
It has such a "summery" feel to it, I think. It reminds me of carefree childhood summers with picnics and book-reading on big, lovely quilts....❤️


Loving the way the quilting turned out. And the seams are all neat and even!!! So far so good !!

Instead of a zipper, I found these great little turqoise hooks in my stash, and I also added these wonderful pom-poms to the edging. They have been waiting patiently in my stash (for years!) to be put into good use, and I think they gave the bag that little extra touch of playfulness that it needed. These were stiched on by hand with invisible stiches. 
It's all in the details, so I added some nice buttons to the handles, just for decorative purposes..
Just a little touch of pinkish red and a little bling...I love bling ❤️


Adding all these decorations were all fun an easy work. The problems occured when I was going to sew the whole thing together...The pattern in the book made no sense to me, and I finally had to give that up,  and figure it out by myself. I had to cut the fabric differently, leaving me with a lot of extra work and some bad language.....

The result is nothing like the one in the book: it is much bigger, no zipper, different bottom and different shape, but you know what: I LOVE  IT ❤️And I'm so proud of the fact that I actually made this on my own - and that I also ended up "designing" it....


Want to see how the bag ended up looking? 

Ta-dah!!! 


Vamos a la playa!! I'm soooo ready for the sunny Californian  beaches!!


I' m now completely hooked on sewing, so I'm already planning on making many more in different colours and sizes. One can never have too many bags, right?? Or shawls, or shoes, or cups or.......well you know how it goes...❤️

I guess I have to wish for a new sewing machine for my birthday....


                                               ❤️Live - Laugh - Love❤️


Mellow Yellow Skappel sweater

$
0
0
Just checking in to share with  you a bit of yellow happiness ❤️❤️

I just realized that I had completly forgotten to show you the finished result of the  "Mellow Yellow Skappel Sweater" I made for Little Missy during the Easter Holiday. 

It has been cherished and worn for weeks now -  she really  loves it!❤️

So soft and comfortable - and warm! The yarn is a mix of silk-mohair and merino wool. 


The pattern is a slightly altered version of the Skappel sweater (link to pattern in Norwegian and English at the end of this post) 

I used moss stich insted of garter stich, and adjusted the size to fit my daughter. Otherwise I pretty much followed the pattern. 


Below are some photos of Little Missy wearing her favourite sweater. She was a very willing model, I must say - posing like a pro! 


Strike a pose! 


Link to the original pattern in Norwegian

Link to an English translation of the pattern.


                                                              ❤️  Live - Love - Laugh❤️


The Daydreamer Shawl

$
0
0

Tah-da! 

My "Daydreamer Shawl" is finally finished, after a year (!) as a WIP....!


Some of you may remember my first excited post about this shawl, way back from last summer, and since then I have been pretty quiet about it..
I really loved working on this, but when I ran out of yarn it all came to a stall...

The project was put on hold in a basket, and before I knew it Christmas was right around the corner and all the gifts and preparations kind of stole my attention for like, uh...10 months?? 

Many new projects have been planned and finished during these months, and I forgot all about my lovely, fluffy Daydream lying there patiently in the basket...

One day I stumbled across it again, picked it up and decided to finish this before the summer. It was far to lovely to be stashed away like that! More yarn was bought, and I once again dived into the lovely lightblue ocean of fluffy silk and alpaca. And this time to finish it!!


My sister was so inspired  by my excitment for this shawl, so she started one for herself in a lovely dusty violet/grey shade. I can't wait to see this one finished as well. It will be lovely! 


Sister - shawls ❤️❤️


And I absolutely LOVE it just as much as I knew I would!!❤️❤️❤️

Again, I apologize for the photo overload, but I'm just so excited about this shawl. 


Soooo soft and light as a feather❤️

Close up...just as pretty❤️


The perfect accessory for chilly summernights. Big enought to really snuggle up in. So, so soft!! Did I tell you that I really, really love this yarn? Oh, yes, I guess I did a few times already. Very excited..:-)

I used one strand of Sandnes Alpaca Silk and one strand of Sandnes Silk Mohair and  a 5 mm crochet hook. 


Big and fluffy❤️❤️

Another close up....This pattern is really beautiful, and it looks much more complicated than it is. 
It is really very easy!

The pattern is a version of The Lion Brands free pattern "Southbay Shawlette", but, as I always do, some minor alterations have been done. The pattern can also be downloaded for free from Ravelry.
I must say, though,  that the photo in Lion Brands pattern does not serve this shawl justice, and if I had'nt found other lovely versions of this online I would not have been tempted to make this at all. I also made the shawl much bigger than the patterns suggests. I like my shawls to be big and snuggly!❤️❤️❤️


The last little detail: my little "signature" heart.❤️

 I may also  add some lace and beads to it as well, but right now I'm too busy wearing it, so any more adjustments will have to wait.


                                                     ❤️Live - Laugh - Love❤️


Live - Laugh - Love

$
0
0

A little Ta-dah! from the archives....


My beloved iPad is screaming for mercy these days, and is probably going on strike soon if it's not relieved from the massive amount of apps and photos stored in this thing...
So, I'm going through all of the thousands (!) of photos in there, and found some shots of the hotwater bottle I made as a Christmas gift for one of my best friends. 

I don't think I've blogged about this before, have I? Since I currently have waaaay to many WIPs going on, I think I might just show you an old Ta-dah! :-)

Anyway, I made a few hotwater bottles last year, and this is probably my favourite! 


I love the soft colours and the pretty buttons ❤️❤️❤️


I made a little loop on the back, so it can hang on the wall when its not use. 

(I apologize for the blurry photos - they were taken in a hurry in bad winter lightning, before the bottle had to be giftwrapped and sent away to its new owner...)


Live - Laugh - Love - it's what it's all about, right? ❤️


I made an opening in the back, so it is easy to take the cover off if it needs to be washed. 


I'm including 2 of the other hotwater bottles I made last year - I think I've shown you these before??

I really love making these covers, and I have so man ideas for upcoming projects! 

I've given them all away as gifts, so I think I need to make one for myself as well...


This is a blue dream for my mother-in-law. The embroidery is Cath Kidston inspired...


A rozy-cozy version for my sister, with the Cath Kidston Provence rose in cross-stich. ❤️


                                                                ❤️Live - Laugh - Love❤️


The children are our future

$
0
0
This post is not about my crafting or my Golden Moments. It does not fit in my Happy Place, which is what this little blog is supposed to be.... It is depressing, it is hopeful, it is honest. It is my personal thoughts and reflections on this special date , that for years to come will cast a dark and cold shadow on even the brightest summerday. This text had to be written to get all these thoughts out of my head. It's long,  and I probably repeat myself and ramble a bit along the way. This is not a political statement, these are only my emotional concerns about the future,  demanding to be put into words. 
If you still want to go ahead and read it, consider yourself warned...: 


22. of July

It's 3 years ago today. 3 years since our peaceful, wealthy and slightly narcissistic little nation was put into a state of unthinkable horror and shock. 3 years since 77 people were brutally killed.
It's 3 years ago - and yet it was yesterday...

This week it all comes back to us: the tears, the numbness, the shock and disbelief from when the first report came about a terrorist attack in the centre of Oslo. The bomb injured hundreds of people and killed 8....The frantic phonecalls and textmessages to everyone we knew who could possible be in the area. (All my friends and family were safe and unharmed! We were lucky. My sister-in-law was having coffee at a cafe one block away from the blast..... Her coffee cup flew out of her hand and across the room. The windows broke into a million sharp pieces that fell on the outside seating area. There was a light rain in the air, so the guests chose to sit inside...lucky)

The utter shock and panic about 2 horrible hours later, when we realized that the terrorist had managed to move to on an idyllic island filled with hundreds of young people on summercamp, with the intent of killing them all...He brutally executed 69 people, most of them were kids. The youngest victim was only 14 years old. 110 were badly injured. More than 300 managed to escape by swimming for their lives away from the island. I know people who were there. I know people who lost loved ones. We all know people who know people affected by this tragedy.


(Photo from the cover of the book 22.07.11)


Norway is such a small country.  We were all affected. It could have been any one of us. It could have been my children....
Who could do something like this in peaceful Norway? Who can hunt down and kill young kids? Who is this evil enemy?

The third shock this horrible day: the massmurderer was "one of us"...The young man smiling at us from the TV screen could have been the boy next door: Blond hair, blue eyes, preppy clothes, posh dialect. The "typical" Norwegian. Not a dark and masked terrorist from a foreign country. When he entered the island he was wearing a policeuniform, and immediately earned the kids' trust -  then he shot them with coldblooded determination.
How did he become so filled with fear and hate? What drove him to do this??
This text is not about his reasons or his twisted ideology. This is not a political message.
These are my thoughts as a conserned human being and mother, on how to build a future where young men do not transform into killingmachines driven by fear and hate.

If one man can show this much hate, just imagine how much LOVE we all can create together....


These were the words of one of the survivors from the island, first spoken in an interview with CNN that horrible day, and soon qouted in all medias the following weeks.

These words are so powerful, and this is how we, as a nation, responded to this terrorist: with an "ocean of roses""The streets were filled with love" in the days and weeks after the attack. We were determined not to let the terrorist win, and responded to his brutal violence and irrational hate with roses and messages of love. Naive? Passive? Maybe. But what good would it do with more violence and more hate?

This world of ours can be so depressive, so brutal, so scary. The news are filled with devastating reports from Gaza, from Ukraine, from Syria....3 years ago it was all about "The Norway Attacks" ...
It's all too much to take in. It's all so hard to grasp. The attrosities are so massive.

I guess that is why so many of us "escape" into pretty blogs etc.. We create our own " Happy Place" to protect ourselves from all the bad, and focus on the good and beautiful things in life. In my opinion a healthy response, as long as we don't close our eyes and ears entirely for the reality.....

I believe the children are the future

How can we raise our chidren in a cruel world like this? How can we find hope for a peaceful and united world?  Why is it so hard to accept eachothers differences and live together in peace??

Being a parent is an enourmous responsibily, and the task of raising our kids to be responsible and caring human beings is huge! I truly believe that "children are the future", and by helping them to become strong, confident, tolerant, generous and unbiased individuals, to teach them to respect and care for others, to help them see themselves as a part of something bigger than themselves, is helping all of us to build a better world. The future is always in the hands of the next generation, but it is our - their parents- responsibilty to create a solid foundation for them to build our future upon.
How do we do that? I don't have all the answers, but I try my best every day.

Teach them well and let them lead the way...

My children are so lucky. They live in one of  the worlds wealthiest countries, and the standard and quality of living is very high. In my opinion, this privileged life makes it even more important to raise them as concious individuals. We, who have the most, have the biggest responsibilty of all to see beyond our own little peaceful "duckpound".

By that, I do not mean that we should in any way feel guilty about our good fortune, and, as some kind of well-meaning martyrs, reduce our standard of living in solidarity of others. We live here, and our lives are good. I tell my kids to embrace that and enjoy all the joy and beauty life brings them. Use their possibilities to create good, to build values for the future.  Just don't ever, EVER, take this for granted!

This is what I try to teach my children every day. Enjoy what we have, but beTHANKFUL, and SHARE with others. Be aware that there is a world out there where the majority is not as fortunate as we are, and try every day to do good, to make someone else feel good. It does not have to be a big thing. Just say something nice to another person, reach out if you see someone look sad and alone, CARE for others.
If a child has this in mind from they are very young, I have high hopes that they will become caring and responsible adults. Some of these responsible adults will become politicians, PMs, presidents: decisionmakers, people with power to make the BIG difference, to change the world. The rest will become caring and responsible "ordinary" people who make the small, but yet important, little difference every day. It's a win- win situation. That is my hope for the future!

(Having said that, I have to add that my kids are NOT saints, nor do I expect them to be. They are kids, they act selfish and spoiled from time to time. They argue, they fight. But I do hope that by creating this awareness in their young minds, they will have a solid, ethical plattform to stand on when the going gets though, and the big decisions have to be made.)

Show them all the beauty they possess inside...


This weekend, despite the depressive news from Gaza and Ukraine, filled me with renewed hope for the future!!
I spent the weekend working as a volunteer at a CISV camp for 14-year olds, and seeing how these kids reflect upon the BIG issues, and the love and respect they all give eachother, regardless of skincolour, religion and nationality is so moving and wonderful to see.
CISV International is a global organization dedicated to educating and inspirating for peace through building inter-cultural friendship, cooperation and understanding. In more than 60 years they have given countless children and young people the experience of their lives and the opportunity to build lasting friendhips through their international educational programmes. (Read more about CISV and the different programs they offer here)

My two sons both participated on a 4-week (!)  long CISVsummer village last summer (at age 11) , and they now have friends all over the world. One went to Brazil and the other to Sweden, and they both had the time of their lives!! They are both planning to go to step-up camp next summer, and I will so incurrage them to do so! When my daughter is 11, we will apply for summervillage for her as well. They have the time of their lives on these camps, bonding for life with children from 12 other countries from all parts of the world. Our sons now skype and chat with kids in Israel, Egypt, the Phillipines, Jordan, USA, Guatemala, China etc. etc.
Catholics, Protestants,Jews, Muslims; different religions, different cultures, different colours, but all best friends and so much alike, despite the differences. New technology makes it possible to stay in touch on a daily basis, even when they live continents apart. What an amazing opportunity this is to create ONE UNITED WORLD! They chat about football, music, girls and everything else kids are into. But we also get a huge doze of reality from these connections, in a much more effective way than watching the news, where the tragedies often go in one ear and out the other. We can't take it all in. It's too much.

The horrible and bloody conflict in Gaza comes very close, when we know a boy who actually live in this area and have to seek refuge from the bombs!!  The tsunami in the Phillipines earlier this year affects us in a much stronger way when we get live reports from my kids friends who is in the middle of the disaster.

These experiences obviously affect my chidlren, and even if they at times act both shallow and materialistic, I know that they already have a broader perspective on the world than many other kids their age. They watch the news with an interest and with reflections that sometimes surprises me.

I believe that my small contribution to a better future, is to actively work to raise consicous and caring children, so that they can grow up to be consious, caring and open-minded adults. This is how we can change the world! By not letting our own fear and anger of the scary and evil  things we don't understand, influence and limit our children, but on the contrary give them the chance to bond across borders, religions and cultures.

Scared people can become dangerous people. Scared people may do scary things. Scared and angry people may kill innocent kids on a summer camp, scared people start wars and shoot down planes filled with innocent people. Scared people can  become dangerous people. Creating fear is the most efficient form of terrorism. Fear is what feed terrorism and make it grow.

I do not want my children to be scared of what they don't understand, even if this world can be a really scary place... I want them to be strong and confident. I want them to see beyond the horrible and biased news reports we receive from warzones and conflict areas. I want them to see the human beings in the midst of all the horror. See that we are all basically the same. See that we all deserve the same respect and love, no matter where we live, how we look, what we believe in.

That means that I have to conquer my own ( and most often irrational)  fear of them getting hurt, and let them "spread their wings", to figure out the mysteries of life for themselves. The good and the bad. I can't protect them from evil, even if I so desperately want to.

After that horrible day 3 summers ago, I really had to force myself to send our own children to summercamp later that summer...My first instinct was to keep them close and never let them out of my sight.
It was even worse last summer when we sent both our sons away on CISV camp for 4 weeks, one as far away as Brazil! As a ( protective) mother, every fibre in my body wanted them to stay at home with me, to shield  them from the scary world out there. Not putting them on that plane without me going with them.
 But how would that have been protecting them? I would only have projected my own fear onto them. Taught them to see the world as a scary place. Taught them to mistrust people.  Made them scared of what they don't know.
We need our next generation to be strong, confident, tolerant and generous.

Scared people can become dangerous people!


If one man can show so much hate, just imagine how much LOVE we all can create together....


                                                  ❤️Live - Laugh - Love❤️


❤️The Summer Slumber Cushion❤️

$
0
0


This summer has been "the best summer ever", with sunshine and blue sky for weeks and weeks! 
A colourful and happy summer, indeed!


So, all my warm wool was put aside, and cool, colourful cotton has ruled my crafting life the last couple of months. I love it!

I started a wonderful v-stich blanket after being "sucked in" on all the v-stich madness that ruled the "crochet world" on Instagram this summer. So many beautiful blankets made it impossible not to start one myself... 

I call this my Summer Slumber Blanket, and I love working on it 


The problem with Instagram: too much inspiration makes you sidetrack from your projects all the time, and the result is an infinite number of WIPs, and not finishing anything!! 

So of course I started a cushion project to match my Summer Slumber Blanket......


Inpired by all my colurful Rice kitchenware I keep at our summerhouse, I wanted to make a fun and colourful cushion to use in my garden lounge. 


I searched online for the perfect grannysquare for such a project, and found the beautiful Rosie Posie Granny tutorial on  the wonderful blog of Sandra Cherryheart


Yellow edging...mmmm❤️


Happy yellow joining  ❤️


Love how this simple joining makes the squares pop ❤️


The back is just one big, happy grannysquare


Happy and colourful, but still lacking that little extra "wow" factor, is it not?


Yes, that's right! Pom-poms are needed!

I really enjoyed making all these little pom-poms :-) ❤️


Hello!


No need for colourful buttons on this one....Plain white ones it is:-)


   Ta-dah!!!   The Summer Slumber Cushion 


..and the back, which can be the front as well....:-)


A wonderful, colourful bouquet of pom-poms ❤️


                        ❤️ Live - Laugh - Love❤️


Coffee love❤️

$
0
0
Summer is over, the kids are back in school and our usual daily chaos and logistic challenges have hit us again with full force...
Work, school, after-school activities, after-work activities, housework (laundry - the never-ending laundry! )

I need coffee! Lots of it!

It has been an amazing summer in this country! The best we've had in 100 years, according to the statistics...
We still enjoy nice weather, and the late afternoon coffee on the porch is the best moment of the day 
But the afternoons are cooler now, and autumn is knocking at the door...


I therefore decided that my beloved French Press coffee pot needed a nice and warm jacket for that autumn chill. 

I'm in love with stripes at the moment, so I made a simple stripey version of plain single crochet stiches. 


I went a little overboard with all the buttons, and can't really decide whether it is too much or just enough :-)


I really love these pretty Tilda buttons ❤️


Coffee for two is served! Hot and delicious ❤️


"The perfect cup of coffee should be 
black as the devil,
 hot as hell, pure as an angel 
and sweet as love."


                    Charles Maurice de Talleyrand 1754-1838


❤️Live - Laugh  - Love❤️


Pretty in pink❤️

$
0
0
Little Missy turned 8 years old this weekend. It is so strange seeing your little babies grow up. It happens way too fast for my liking. I mean, of course I want them to grow up, but the days and years go by so fast! The fact that it is 8 years ago since that this little bundle of joy came into our family is hard to believe. It feels like yesterday. 

From the day she was born, she has been a happy ray of sunshine in our lives. Always smiling, always positive, always caring for others. Twisting her two older brothers (and her father) around her little finger....she gives them "that look", and she gets her way....❤️

She's a real sweettooth, so her wishlist for her birthday always include lots of cakes....
 I really love to bake, so I usually do my best to accomodate her cake wishes. 

This year the list included french macarons and cupcakes. Pink.....


French macarons with lemon and raspberry filling ❤️❤️


Vanilla cupcakes with whipped vanilla bean frosting ❤️ 
This frosting is very similar to swiss merengue. It is wonderful to work with, and the taste is really yummy! I'm not too fond of trafitional buttercream  - I find the taste of butter a little too heavy.....
This frosting, however, is light and sweet, and melts in your mouth❤️  On the cake, however, there is no melting. The frosting stays in place, and looks great even after a day or two...if there's still any cake left by then...
I usually put the decorated cupcakes in the oven for 1-2 minutes under the grill, so the surface stiffens a bit. Just make  sure you watch it - do not let it in there too long!  It is only supposed to have a thin, invisible crust. This makes it easier to transport the cakes without messing up the beautiful piping.


You can find a great recipe and step-by-step tutorial for this wonderful frosting in the amazing blog Passion for Baking


A very happy birthdaygirl❤️❤️


All set for a "pretty in pink" gardenparty ❤️


❤️Live - Laugh - Love❤️


Passion for baking...❤️

$
0
0
Two confirmations and two birthday parties, spread across the last 4 weeks, kind of set the agenda for how to spend my weekends this last month....

Don't get me wrong, I really love baking, but I must admit that even a passionate amateurbaker as myself has had enough of all the sugar and frosting by now.... :-)

I'll try not to overload you with cakes and stuff, so I'll portion it out on several posts, and in a few days I hope I will get back to my wool and crochet....I really miss my needles and yarn...so much better on the thighs, too......he, he!


Anyway, today, I'll show you what I made for the confirmation of "the boy next door"....


These goodies in soft blue/aqua/creme tones were made for our neighbours son's confirmation a few weeks ago. Inspired by the colourtheme for the tablearrangements, I made some sweet merengue roses.... 


....and a yummy Oreocake covered in roses, made of cream cheese frosting. 

Oreocake really never fails! There wasn't  a crumb left of this cake after the party....


The flower decorations on the table. So pretty! ❤️


Time to relax....until next weekend with another confirmation....


❤️ 
Live - Laugh - Love 
❤️


Cakes and music ❤️

$
0
0


Last weekend was the confirmation of a friend's daughter, and since she is a very eager singer and pianoplayer, the theme for the party was music and notes. 

A nice challenge❤️

I made some vanilla cupcakes with the amazing Vanilla Bean Frosting on top...


From sugarpaste, I cut out notes with a sharp knife and let them dry overnight. 


Perfect:-)


French macarons were on the order, so these pink pretties were decorated with a little treble clef, to fit with the musical theme...


The place settings and the cakes.....A perfect match 


❤️ Live - Laugh - Love ❤️


Happy Colours Tah-da!

$
0
0
This post is a really colourful one!  
I have finally, after more than a year as a   "almost finished but already in good use" blanket, finished my son's 

"Happy ColoursBlanket


This blanket was actually finished last autumn, but the edging remained....
I kept procrastinating the prosess of making all those tiny 1/4 hexagons that I was convinced was crucial for a nice and even border..

The blanket was, however, adopted by the kids immediately, so it has really been in very good use the past year. 

But when I brought it out from summer storage a month ago, I decided that enough was enough: the edging had to be finished!

After fumbling along with those stupid parts of the hexies for days, I frogged the whole idea and started from scratch. 

I chose a different appoach, and made a row of half trebles along the whole blanket first, trying to decrease evenly in the short sides to make it as straight as possible. 
After a few rounds of trial and error, and a lot of frustration, I finally managed to make it look fairly decent, and continued with a few rows of half trebles in the back loops only. I really like this structure, and when using double thread for the edging, the border came out firm and (almost) straight :-)

I added a simple picot to the last row, to make it a little more intereserting. The blanket is for a boy, so it shouldn't  be to "lacy" and sweet. 


Here is this is the final result, laid out in all it's glory :-) ❤️


The edging is not 100% perfect, but I'm quite happy with it anyway!


A close-up of the border on the rippled short sides..


I took it for a test-run on Little Missy's  bed, just to show the size of it. Her bed is 200 x 90 cm.


Happy Colour Therapy! ❤️❤️❤️❤️❤️

I'm so o happy I can finally  tick this one off the list.

Now the plan is to finish a few of my other WIPs that keep laying around...
I have quite a few....


Until next time: 

❤️Live - Laugh - Love❤️


Somewhere over the rainbow

$
0
0
This is one of those "indoor days", when leaving the house is limited to a short run to the mailbox to get the Sunday newspaper...

The rain is pouring down outside, the wind is houling, the threes are left bare and naked, stripped of all their autumnal, golden glory!

Ahead of us are months of this.....

Today I need some colours! I need sunshine! I need memories of warm and sunny days!

I need to show you some snippets of the colourful birthdayparty we threw for Little Missy and her friends. Just so we can remember that somewhere over the rainbow there are days like this:


Rainbow cake !  A HUGE success! 
I wish thes photos could come with the sound of 15 girls squealing when the cake was cut, and the rainbow inside was revealed  :-)


Until next time...

❤️Live - Love - Laugh❤️


❤️Annas pulsvanter - norsk oppskrift❤️

$
0
0


Da har jeg endelig klart å finne tid til å få denne oppskriften på plass! Jeg har fått mange spørsmål etter oppskrift etter at jeg postet bilder av pulsvarmerne på  Instagram for et par uker siden.
Høsten er "ekstrem-tid" på  jobb, så det har vært lange dager på kontoret og mye reising, så selv om jeg mye heller skulle laget mønster og kost meg med håndarbeid, har det rett og slett ikke blitt tid før nå...Tusen takk for tålmodigheten til alle dere som har ventet!

Da jeg selv lærte meg å hekle for halvannet år siden, var jeg helt avhengig av å følge trinn-for-trinn oppskrifter med bilder, og var evig takknemlig for alle bloggerne som generøst delte sine oppskrifter, og tok seg tid til å ta bilder av prosessen.
Nå da jeg selv har prøvd meg på egne design, tenker jeg at nå er det min tur til å dele, og vil gjerne gjøre det så enkelt at selv helt nybegynnere på hekling kan klare å følge med. For å få alt så riktig og enkelt som mulig, har jeg derfor brukt mange timer på finjustering av oppskrift, og på å ta tydelige bilder  (ikke lett med gode bilder nå i november, når jeg kun er hjemme i dagslys i helgene, og det stort sett er grått og trist ute....)

 Selve oppskriften er ikke vanskelig, men når jeg sitter på egenhånd og prøver meg fram er det lett å ta "snarveier" og justere underveis. Når andre skal følge oppskriften, MÅ derimot alt være riktig, og da blir det mye telling og finjustering. 

Jeg er 100% selvlært, både når det gjelder hekling og skriving av oppskrifter, så jeg håper dere vil gi meg tilbakemeldinger dersom noe bør gjøres på en bedre/annerledes måte. 
Oppskriften under er ikke testet av andre enn meg selv, så dersom dere finner noe som er feil eller uklart håper jeg dere gir beskjed, så jeg kan få justert det. Det er lett å bli "blind" for slikt når man sitter for tett på, så alle tilbakemeldinger mottas med takk!!!


OK - her kommer oppskriften, oppkalt etter min datter som fikk det første paret jeg lagde❤️


❤️Annas pulsvanter ❤️

Garn brukt her: Lys rosa "Sterk"fra Du Store Alpakka (40% alpakka, 40% merino, 20% nylon)
Heklenål: 3 mm

Forkortelser: 
m = maske
lm = luftmasker Se instruksjonsvideo her
fm = fastmasker Se instruksjonsvideoher
kjm = kjedemaske Se instruksjonsvideo her
halvst. = halvstav. Se instruksjonsvideo her
st  = stav. Se instruksjonsvideoher
Gjenta det som står mellom * og *


Tips før du begynner:
Dersom du vil bruke tynnere eller tykkere garn må maskeantallet justeres. NB! For at borden øverst skal gå opp i mønsteret må maskeantallet være delbart på 6.
Prøv deg frem med oppleggsraden rundt håndleddet. Den skal passe løst rundt håndleddet, uten å stramme. Husk at den ferdige vanten er elastisk, så ikke lag opplegget for løst...
Størrelsen er tilpasset min hånd, så det er uansett lurt å prøve seg litt frem litt når det gjelder størrelse.

Oppleggsrad: 
Jeg bruker alltid oppleggsrad (engelsk: single crochet foundation chain) i stedet for luftmasker. På denne måten hekler man 1. og 2. omgang i ett, og får en penere og mer elastisk kant. På små prosjekter som dette går det selvsagt også fint med luftmasker, dersom du synes det blir for komplisert med oppleggsrad, men skal du lage store pledd el.l. kan jeg ikke tenke meg å begynne på en annen måte enn med oppleggsrad.  Her er link til en god videotutorial som viser hvordan denne raden hekles. Litt plundrete i starten, men "revolusjonerende" når du først får det til :-) 

(PS: har du laget oppleggsrad tidligere og er fortrolig med denne teknikken, kan du lage den med halvstaver med en gang, så slipper du en omgang og kan hoppe rett til omgang 3. Jeg har valgt å gjøre det med fm her for ikke å komplisere det for mye....)


1.omgang: 
Hekle en oppleggsrad med 42 masker (evt,. legg opp 42 lm, og hekle en rad fm i disse før du går videre til omgang 2)
Bildet viser "baksiden" av oppleggsraden, som er de maskene vi skal bruke i omgang 2.


2. omgang:
Sett sammen raden du har heklet til en ring med en kjm.  Hekle 3 løsmasker i første maske (fungerer som første halvmaske), videre hekler du halvst i alle 42 fm runden rundt. Se bildet under.


3. omgang: 
*2 st i første m, hopp over 2 m, 4 st. i neste m, hopp over 2 m* omgangen rundt. Du skal ha totalt 14 grupper med staver når du er rundt.
NB! Pass på at du avslutter med 4 st. i m, slik at beg. å¨neste omgang blir lik slutten på forrige. Dette blir på baksiden av vanten, og gjøres for at borden vi skal avslutte med skal bli riktig...


4. omgang:
Sett en maskemarkør i begynnelsen av omgangen, og flytt denne oppover etterhvert som du hekler. 
Alle omganger begynner etter denne markøren,

Hopp over 1 m., 4 st mlm de to st. i raden under. *hopp over 3 m, 2 st. mlm. st.i raden under* 

Du skal nå ha 4 st.i midten av gruppene med 2 st fra raden under, og 2 st  i midten av gruppene med 4 st. i raden under. 

5. omgang.
Hopp over 2 m., 2 st. mlm. de to st. i raden under. * hopp over 3 m,  2 st. mlm. st. i raden under* 


Omgang 6 -15: 
Gjenta omgang 4 og 5 annenhver gang til du har 12 rader med mønster. Evt. juster lengden slik du ønsker. Pass på at siste omgang avsluttes med en gruppe med 2 st. på baksiden, som på bildet under.


Bildet under viser fremsiden. 


Dersom du vil, kan du stoppe her og lage pulsvarmere ute tommel. De vil da være omtrent så lange på hånden din (bilde 7)

Dersom du vil fortsette og lage vante med tommel, hopper du over de neste bildene, og går du rett til bilde 12, omgang 16.


Omgang 16, bord:
Hopp over 2 m, 1 kjm mlm st. fra omgangen under. *hopp over 3 m, (3 st, 2 lm, 2 st) mellom st. fra omg. under, hopp over 3 m, 1kjm mellom st av omg. under*

NB! Merk at sist kjm hekles i samme kjm som du startet omgangen med. (Se bilde 9 )


Borden skal se slik ut ved avslutning. Siste kjm hekles i samme kjm som du begynte omg. med


Fest trådene og du er ferdig!!


 Tah - da! 


Bildene under viser hvordan du lager vanten med tommel.


Omgang 16:
Her skal du lage hull til tommelen.
Hopp over 2m, 2 st, mlm st. i omg. under, hopp over 3 m, 4 st. mlm.  st. i omg. under, hopp over 3 m, 2 st. mlm st. i omg. under. Hekle en oppleggsrad med 6 m, eller hekle 6 luftmasker.
Hopp over 9 m , og hekle 4 st. mlm st. fra omg. under. (se bilde 13)

NB! Jeg ser på bildet  at jeg har heklet en st for mye i gruppen med 4 st. som skal hoppes over...Dette har ingen betydning for mønsteret videre, så jeg tar ikke nytt bilde for dette. Bare vær obs på at det skal være 4 st., ikke 5 som på bildet....


Bildet under viser hvordan hullet til tommelen skal se ut. 


Omgang 17:
Hopp over 1 m, 4 st mlm st. i omg. under, hopp over 3 m, 2 st. mlm. st, i omg. under, hopp over 3 m, 4 st mlm st. i omg. under. 

Nå har du kommet til oppleggsraden til tommelen. Pass på at du hekler i baksiden av denne, hvor maskene er tydelige.  Hopp over 2 m,, 2 st.i m, hopp over 2 m, 4 st, i m, hekle 2 st. i midten av de 4 st. i omg. under. Se bilde 14) 


Slik ser hullet til tommelen ut fra baksiden


...og slik ser det ut på fremsiden


Omgang 18 - 21: 
Fortsett så videre oppover på samme måte som før hullet til tommelen
Gjenta omgang 4 og 5 annenhver gang til du har 18 rader med mønster. (Evt. juster lengden slik du ønsker).  Pass på at siste omgang avsluttes med en gruppe med 2 st.,på baksiden (se bilde 5)


Omgang 22 - bord: 
Hopp over 2 m, 1 kjm mlm st. fra omg. under. *hopp over 3 m, (3 st, 2 lm, 3 st) mellom st. fra omg. under, hopp over 3 m, 1 kjm mellom st av omg. under* (Se bilde 8)


NB! Merk at sist kjm hekles i samme kjm som du startet omgangen med. (Se bilde 9 )


Slik ser borden ut på fremsiden


Tommel

Da har vi kommet til tommelen. Ikke vanskelig, men kanskje litt plundrete...

1. omgang:
Fest tråden i midten av de 4  st. i raden under (se x på bildet under), og hekle 3 lm. Dette utgjør første st. Hekle så 1 st. i samme hull, hopp over 2 st og hekle 4 st. mlm de 2 st fra omg. under, hopp over 3 m, 2 st mlm. st fra omg. under, hopp over 3 m, 4 st. mlm st. i omg. under (her er det allerede 4 st., så i denne blir det totalt 8 st. 4 til tommel, og 4 til vanten). 
Hopp så bort til gruppene med 4 st. i omg. 17 (den du laget i oppleggsraden for hullet til tommelen), og hekle 2 st. i denne. Hopp over 2 m, og hekle 4 st. i gruppen med 2 st. fra oppleggsraden.


2. omgang:
4 st. mlm. de 2 st. fra omg. under (se X på bildet under)
 *Hopp over 3 m, 2 st. mlm. st. fra omg. under, hopp over 3 m, 4 st. mlm. st. fra omg. under*


Slik begynner tommelen å ta form på fremsiden


3. omgang: 
*Hopp over 3 m, 2 st. mlm. st. fra omg. under, hopp over 3 m, 2 st. mlm. st. fra omg. under*

Nå er tommelen antagelig lang nok (mål på hånden din, og lag en ekstra runde dersom du ønsker det)


4. omgang - bord
*Hopp over 3 m, (3 st, 2 lm, 3 st) st. mlm st. i omg. under, hopp over 3 m, en kjm mlm st. fra omg. under*


Slik ser den ferdige tommelen ut fra fremsiden


Fest alle tråder,og du er ferdig!

Tips: hvis du synes hullene rundt tommelen blir litt for store/løse, kan du sy disse litt sammen når du fester tråden. 


Tah-da! 

En stk ferdig pulsvante med tommel! 


Den andre vanten lager du på samme måte, men husk å lage hullet for tommelen på motsatt side!

Omgang 16 - venstre hånd:.
Hopp over 2m, 2 st, mlm st. i omg. under, * hopp over 3 m, 4 st. mlm.  st. i omg. under, hopp over 3 m, 2 st. mlm st. i omg. under. * Gjenta fra * til * 4 ganger

Hekle en oppleggsrad med 6 m, eller hekle 6 luftmasker.
Hopp over 9 m , og hekle 4 st. mlm st. fra omg. under. (se bilde 13)
Hopp over 3 m, 2 st.,mlm. st. i omg. under, hopp over 3 m, 4 st. mlm. st. i omg. under.

Tah-da! 

To stk ferdige pulsvanter med tommel! 


Jeg blir veldig takknemlig for både ros og ris, så ikke nøl med å legge igjen en kommentar under.

Lykke til !!


❤️ Live - Laugh - Love ❤️


❤️Anna's fingerless mittens - english pattern ❤️

$
0
0


Finally! The pattern and photo tutorial for "Anna's fingerless mittens" is ready!
(Scroll down to next post for pattern in Norwegian!)

I've had so many requests for this pattern after I posted some photos on  Instagram a couple of weeks ago, and I thank you all for your patience. 

When I first taught myself to crochet about a year and a half ago, I loved following step-by-step tutorials, and I was so grateful to all the wonderful bloggers out there who generously shared their pattern, and even took the time to take great photos of the process. How wonderful for beginners at crochet to be able to learn this way!

Now that I have tried to make a few patterns myself, I wanted to share some of  my patterns the same way. 
I have counted and re-counted and shot many, many photos of this process. (Good photos are really difficult in November, when you're barely home during daylight... My wish for Christmas: a professional photolamp...)

I'm 100% self-taught when it comes to both crochet and pattern writing, so please let me know if you find any mistakes or have tips for improvement !!


OK -  here goes...the pattern for "Anna's fingerless mittens" (named after my daugher ❤️)


❤️Anna's fingerless mittens ❤️

Yarn used in the pattern: Light pink  "Sterk" from  Du Store Alpakka (40% alpaca, 40% merino, 20% nylon)
Hook : 3 mm


Note: the pattern is written in US terminology. Below are the terms in both US and UK. 

US terms


UK terms

sl st slip stichscsingle crochet
scsingle crochetdcdouble crochet
hdchalf double crochethtrhalf treble crochet
dcdouble crochettrtreble crochet
trtreble crochetdtrdouble treble crochet
dtrdbl treble crochettrip tr/trtrtriple treble crochet
rev screverse single crochetrev dcreverse double crochet
yo yarn overyohyarn over hook


Abbreviations: 
ch: chain stich See video here
hdc: half double crochet See video here
sc: single crochet See video here
st: stich
sl st: slip stich See  her
dc: double crochet See video here
yo: yarn over
Repeat directions between * and *


Tips before you start:
If you want to use thicker or thinner yarn, the number of stiches must be adjusted. The number should be able to divide by 6, to make the border neat and even.
Measure your wrist with the foundation chain. It should fit loosely around your wrist without being too tight.
Remember that the finished mitten will be quite elastic, so don't make it too loose.

The size in this pattern fits my hand, so you should test it on yourself along the way, and adjust it if it feels too tight or too loose.
.

Foundation chain: 
I always start my projects with a single crochet foundation chain instead of chain stiches. This way, you make row 1 and 2 in one go, and you get a much neater and elastic start on you project.

Here is a link to a great  videotutorial , if you're not familiar with this technique.
It can be a little tricky in the beginning, but once you get the hang of it, it feels like a little "crochet revolution" :-)

(PS: if you are familiar with this method, you can make a foundation chain with hdc instead of sc, and skip all the first 3 rows. See video here
I chose to do it with sc here, to make it less complicated for beginners.


Row 1: 
Make a single crochet foundation chain with 42 stiches (or make a chain of 42 st and make sc into eact of the stiches)

The photo shows the "backside" of the foundation chain, which are the st we will use for row 2.


Row 2:
Make a ring using a sl st in the last chain in the row. Chain 3, then make 1 hdc in each st around the ring. See photo below.


Row 3: 
*2 dc in first st. *skip 2 sts. 4 dc. in next. st., skip 2 sts , 2 dc in next st*
Repeat from * to * around.

NB!
Make sure you end the round with 2 dc, so the beginning of the round are the same as the end of the previous round.
This is to make sure that the finihing border will be nice and even.This will be on the backside of the mitten (the inside of you hand)


Row 4:
Place a stichmarker in the beginning of the round, and move this along when you crochet. 
Every row starts after the stichmarker.

Skip 1 st, 4 dc between the 2 dc in the previous row  * skip 3 st, 2 dc between the dc in the previous row* Repeat from * to *  around. 

You will now have a group of 4 dc in the middle of the groups of 2 dc in the previous round, and a group of 2 dc in the middle of the groups of 4 dc in the previous row.


Row 5:
Skip 2 st, 2dc between the 2 dc in the previous row. *skip 3 st, 2 dc between the dc in the previous row* Repeat from * to * around. 


Row  6 -15: 

Repeat row 4 and 5 until you have 12 rows with pattern.Make sure that the last row ends with a group of 2 dc. Se photo below.


The photo below shows the front of the mitten: 


If you prefer to make wristwarmers without the thumb, you can stop here and start on the border. 
The size will then be approximately like this on your hand (see photo 7 below)

If you want to continue and make a fingerless mitten with thumb, skip the next photos and go straight to photo 12, row 16


Row 16, border:
Skip 2 st, 1 sl st. between the dc in the previous round. * skip 3 st. (3 dc, ch 2, 3 dc) between the dc from the previous row, skip 3 st, 1 sl st between the dc in the previous row* Repeat from * to * around.
See photo below.

NB! Note that the last sl st is made in the same space as the sl st you started with. (se photo 9)


This is how the border looks like on the back. The last sl st is made in the same space as the sl st you started with. See photo below.


Fasten off and you're done !!


 Tah - da! 


The photos below show how to make the mitten with a thumb


Row 16:
You will now make the opening for the thumb
Skip 2 st, 2 dc between the dc in the previous row, skip 3 st, 4 dc in between the dc in the previous row, skip 3 st, 2 dc between the dc in the previous row. Make a single crochet foundation chain of 6 sts (or chain 6 )
Skip 9 sts, 4 dc between the dc from the previous row. (see photo 13)

NB!I can see from the  photos that I have made onedc too many in the group of 4 dcs.... You will skip these stiches anyway, so it does not affect the rest of the pattern, but just be aware that this is a mistake, and all the groups should be with 4 dc, not 5 ...
.


The photo below shows hos the opening for the thumb should look


Row 17:
Skip 1 st, 4 dc between the dc in the previous row, skip 3 st, 2 dc between the dc in the previous row, skip 3 st, 4 dc between the dc in the previous row.

Now you're at the foundation chain for the thumb. Make sure you crochet on the backside of this, where the stiches are more defined. Skip 2 st, 2 dc in next st, skip 2 st, 4 dc in next st, 2 dc between the dc in the previous row. See photo below


This is what it looks like from the backside


...and from the front.


Row 18 - 21: 
Continue the same way as before you made the opening for the thumb, 
Repeat row 4 and 5 until you have 18 rows with pattern. Make sure that the last row ends with a group of 2 dc.(see photo 5)


Row 22 - border: 
Skip 2 st, 1 sl st between the dc from the previous row * skip 3 st, (3 dc, ch 2, 3 dc) between the dc from the previous round, skip 3 st, sl st between the dc in the previous row* Repeat from * to * around. See photo 8 below:


NB! Note that the last sl st is made in the same space as the sl st you started with (see photo 9 below)


This is how the border looks from the front


Thumb

Now it's time to make the thumb. It's not very difficult, but can be a little fiddly..

Row 1:
Fasten the new yarn in the middle of the group of 4 dc in the previous row (see X in the photo below) Chain 3 (this will be the first dc). 1 dc in the same space. Skip 2 st, 4 dc between the dc in the nprevious row, skip 3 st, 2 dc in between dc in the previous row, skip 3st, 4 dc between the dc in the previous row (this space already holds 4 dc from round 17, so the total in this space is 8 dc, 4 for the mitten and 4 for the thumb)
Jump to the group of 4 dc in row 17, the one you made in the foundation chain for the thumb), and make 2 dc in the middle of this group. Skip 2 st, 4 dc in the 2 dc group from the foundation chain.


Row 2:
4 dc between the dc from the previous row (this completes the circle for the thumb) * skip 3 st, 3 dc between the dc from the previous row, skip 3 st, 4 dc between the dc in the previous row* 
Repeat from * to * around. 


This is how the thumb starts to form on the front


Row 3: 
* Skip 3 st, 2 dc between dc in previous row, skip 3 st, 2 dc between the dc in the previous row* Repeat from * to * around. 

The thumb is now probably long enough, and you are ready to start with the border (measure this on you hand, and add en extra row if you prefer to have it longer)

Row  4 - border:
Skip 3 st, (3 dc, ch 2, 3 dc) between the dc in the previous row, skip 3 st, sl st between the dc in the previous row* Repeat from * to * around. 


This is how the thumb looks like from the front


Fasten off and you're done!

Tip: if the holes around the thumb turn out a little loose and too big, you can close these up when you fasten the yarn.


Tah-da! 

One fingerless mitten done! 


You make the other mitten the same way, just remember to make the thumb on the opposite side.


Row 16 - left side:.
Skip 2 st, 2 dc between the dc in the previous row * skip 3 st, 4 dc between the dc in the previous row, skip 3 st, 2 dc between the dc in the previous row* Repeat from * to * 4 times. 

Make a single crochet foundation chain of 6 sts (or chain 6 )
Skip 9 sts, 4 dc between the dc from the previous row. (see photo 13)


Tah-da! 

Two fingerless mittens all done! 


.


I really hope you have enjoyed this pattern, and will love these mittens as much as I do ❤️

I appreciate all your comments, so please do not hesitate to give me your feedback on this pattern, so I can correct any mistakes!

Good luck!


Until next time....

❤️ Live - Laugh - Love ❤️


Let it snow, let it snow, let it snow...

$
0
0

Just a quick check- in before December and this year(!) come to an end - to let you know I'm still here....


This month flew by way to quickly and with way too much to do (as always...), so blogging ended up the last on my priority list, unfortunately...

But I found time to make a few crochet presents for Christmas, so I'll give you a quick run through some of my latest projects from the hook and in the kitchen...

This December has been all about snowflakes - these facinating beauties that are so fragile and so unique. 

I've never made crochet snowflakes before, but when i first started I was hooked! A bit fiddly to make, I must admit, and it took me a great deal of patience and willpower to finish the first one, but when I found the teqnique it was all fun from there 

Here are a few....


I made some alpaca mittens for a dear friend, and the snowflakes were a perfect match for these. 
I could not resist putting on a little "bling" in the middle....❤️


Babymittens in alpaca....


...and matching booties ❤️


The full set!  If I find the time to write down the pattern, I will let you know...


All wrapped up and ready for a little newborn Winter Princess 


I continued with my snowflake obsession in the kitchen as well...

My lovely neighbours got a box of French macarons for Christmas


....but I saved a few for myself to enjoy with my coffee... ❤️

I love this cup! It's from a series of annual Christmas cups from Royal Copenhagen, and I collected a few of the, before they were discontinued a few years ago. Now I'm constantly looking for more through thrift shops and online - so far with no luck...


I made a few marzipan snowflakes as well, and they were perfect on this delicate and fragile cookie. The pattern is so intricate and pretty!


The traditional Christmas cake even got in to the snowflake theme this year....
This heavy thing will probably last until Easter, but there's just no Christmas without it ❤️


Until next year.....


❤️Live - Love - Laugh❤️


LYKKEHJERTE - English pattern

$
0
0


(Pattern in Norwegian can be found here)

I have crocheted many hearts in different shapes and sizes thought the years. There are so many wonderful patterns online, but they all have in common that the heart is filled with polyester stuffing, and I find difficult to get a nice and even shape of the heart working with this.

Last year I made heaps of colourful eastereggs using styrofoam eggs, and I figured that this had to be possible for a crocheted heart as well..

I bough styrfoam hearts in different sizes and shapes, and started on my quest for the Perfect Chrochet Heart...

A great bit of trial, error  and frogging later, I was finally happy with the result.
The shape was nice and even, the crochet fit tight and snug around the heart.  Perfect ❤️


Over at Intagram, I've had quite a few requests for a pattern for these hearts, so after some hectic afternoons of  chasing the few hours of daylight left after I get home from work, I've finally managed to get decent enough photos of the process, to offer you a patter/tutorial.

Since the number of stiches, rows, increases and decreases will vary accoring to the size and shape of your styrofoam heart, this "pattern" in not absolute. These are only guidelines, and a step-by-step description of how to do it. Please ask me if you find my explanations confusing, and I'll try to explain it better...
   

Good luck!


❤️ Lykkehjerte ❤️

("Happy Heart")


You need: A styrofoam heart in the size and shape of your desire (most craftsuppliers sell these)
Yarn in your desired colour/quality. (I have used different types of thin cotton, and a 2,5mm hook)
Crochet hook, scissors and tapestry needle
Stichmarkers

The styrofoam heart I'm using here,  measures approx. 12 x12 cm, and I bought it here: Panduro

The first 4 rounds are the same regardless of the size of your heart. 
You crochet in the rounds, so there are no visible round changes.


Abreviations: 
sc = single crochet  (see instructions here )
hdc /htr = half double crochet  /half treble corchet US/UK ( see instructions here )

I will use US terms in the tutorial


Round 1:  Make a  "magic ring" with 6 sc. (See instructions here)


Round 2: place a stichmarker at the beginning of the round (or a thread in a contrast colour, as I do here. I could not find my stichmarkers...) Crochet 2 hdc in every sc around. In total 12 hdcs.

Round 3: 2 hdc in every hdc around.. In total 24 hdcs.


Round 4: Crochet 2 hdc in the hdc by the stichmarker, then 1 hdc in every hdc 11 times. 2 hds in the next hdc, and place a new stichmarker between the 2 hdcs. Crochet 1 hdc in every hdc 1 times, until you reach the next stichmarker. 


Round 5 and further rounds: 2 hdc in hdc by the stichmarker, 1 hdc in every hdc until you get to the next stichmarker. 2 hdc in the hdc by the marker. 1 hdc in every hdc until you reach the next marker.
Continue like this until you are approx 1 cm below the point where the shape starts to curve inwards.

Remember to measure your work around your styrofoam heart several times as you crochet, to check if you need to increase more or less. Your work should fit nice and snug around the heart. Not too loose, not too tight.....


The heart in this example is quite big and wide shaped, so I increased once in every side, every round,  until round 11, then I started to increase 3 times in both sides for the following rounds.

Too increase 3 times, I made 2 hdc in the hdc before the marker, 2 hdc in the hdc at the marker, and 2 hdc in the hdc after the marker.


When you reach the point where you are approx 1 cm below where the heart curves inward, crochet 1 hdc in every hdc around. No increases.


From this round and onwards, you have to crochet around the styrofoam heart. A bit fiddly at first, but you'll soon get the hang of it. 


The following round (s): Decrease  2 or 3 stiches on both sides (by the marker), by crocheting 2 hdc together. 


Tip: when crocheting 2 hdc togehter, use only the front loops of the stich, This will make the decrease amost invisible.


On  smaller hearts, you will be probably only need 1-2 rounds with descresing before you're at the top, but on a big heart like this it will take a few rounds to get the shape nice and even. 


When you have reached the top, continue with hdc in every hdc until the middle of the heart. Crochet together the two sides with a sc, pulling it tight to get a nice heart shape. Continue crocheting the two sides together with scs.

When the heart is closed on one side, continue further down the side of the heart with scs between the hdcs in the sideincreases.

Tip: To make this edging nice and tight, I usually make one sc over two threads between the hds. 
(See photo below)


When you reach the pointed end at the bottom of the heart, make sure your sc starts at the row of increases on the next side, and continue with scs up the other side.

When you reach the top again, close the two open sides woth scs, and use a tapestry needle to fasten the thread in the middle. Tighten and adjust the shape until you are happy.


Tah-da!


If you like, you can adorn you heart with some flowers or ribbons. The possibilites are endless :-)

I really love the simplicity of these clean, colourful hearts, thougt, and find them the prettiest hanging from a flowering Cherry or Magnolia branch - in all their simple beauty ❤️

I hope my little LYKKEHJERTE gives you lots of happiness!

PS: If you give these little Happy Hearts a try, I'd love it if you leave a trail here on the blog, or tag me on Intagram.  ❤️

❤️ Live - Laugh -  Love ❤️


LYKKEHJERTE - norsk oppskrift

$
0
0

(Find English pattern here )


Jeg har heklet veldig mange hjerter de siste årene, med forskjellig form og størrelse. Det finnes mange fine oppskrifter på nettet, men felles for alle jeg har sett og prøvd er at de fylles med fyllvatt, noe som ofte gjør det vanskelig å få en jevn og fin fasong på hjertet. Det blir fort litt klumpete og skjevt, og henger ikke alltid like fint. 

Etter å ha heklet mengder med påskeegg av isoporegg, tenkte jeg at denne metoden måtte da kunne brukes på hjerter også. 

Jeg kjøpte derfor isoporhjerter av ulike former og størrelser og satte i gang med stort pågangsmot.

Det ble en del prøving og feiling for å få økninger og fellinger rett, slik at maskene satt tett og jevnt rundt hjertet, men når jeg først knakk  koden, er disse hjertene superenkle å få fine❤️


Formen er jevn og fin, og de henger fint pga. den lette isoporen. Etter å ha fått mange spørsmål på Instagram om mønster på disse hjertene, har jeg nå laget en liten steg-for-steg beskrivelse av hvordan de lages. Denne oppskriften er altså ganske «løs», da du må tilpasse antall omganger og økinger/fellinger  til garnkvalitet og størrelse/form  på isoporhjertet du bruker. Dette er altså  en beskrivelse av fremgangmåten mer enn en nøyaktig oppskrift. Spør gjerne dersom du har problemer med å forstå hva jeg mener! Lykke til!! 


❤️ Lykkehjerte ❤️

Du trenger:
Hjerte av isopor i ønsket størrelse (fås kjøpt i de fleste hobbybutikker)
Garn i ønsket farge/kvalitet. (Jeg har brukt ulike typer tynt bomullsgarn og heklenål 2,5 mm)
Saks og stoppenål
Maskemarkører

Hjertet jeg bruker her måler ca. 12x12  cm og er kjøpt her:  Panduro.  
De første 4 omgangene er like uansett størrelse på hjertet. Hjertet hekles rundt hele veien, så det er ingen synlige overganger til neste runde.

Forkortelser: 
fm = fastmasker (se instruksjonsvideo her )
hs = halvstaver ( se instruksjonsvideo her )


1. runde: Lag en "magisk sirkel" med 6 fastmasker. Ser hvordan du lager en magisk sirkel her


2.runde: sett en maskemarkør i starten av omgangen (eller tråd, som jeg har brukt her siden jeg ikke fant markørene mine i farten...). Hekle 2 hs i hver fm omgangen rundt. Totalt 12 hs. 

3. runde:2 hs i hver hs omgangen rundt. Totalt 24 hs. 


4.runde: Hekle 2 hs i hs ved markøren, videre 1 hs i hver hs 11 ganger. 2 hs i neste hs, og sett en ny markør mellom de to hs. Hekle 1 hs i hver hs 11 ganger, til du kommer til neste markør. 


5. runde og videre:2 hs i hs ved markøren, 1 hs i hver hs til du kommer til neste markør. 2 hs i 1 hs ved markøren. 1 hs i hver hs til neste markør. Fortsett slik oppover til du er ca. 1 cm fra der hjertet begynner å svinge innover igjen. 

Husk å måle på isoporhjertet underveis, for å sjekke om du må øke mer eller mindre for at det skal sitte tett og fint rundt hjertet. 


På hjertet i dette eksempelet, som er ganske stort og har en bred fasong, økte jeg 1 gang i hver side til og med runde 11. Så økte jeg 3 ganger i hver side hver omgang videre. For å øke tre ganger, heklet jeg 2 hs i hs før markøren, 2 hs i hs ved markøren, og 2 hs i hs etter markøren. 


Denne forklaringen er kanskje være litt forvirrende, men måler du underveis, vil du raskt se om det sitter for stramt eller løst rundt hjertet, og  justere deretter. 

Når du er ca. 1 cm fra der hvor hjertet begynner å runde innover igjen, hekler du 1 hs i hver hs runden rundt.


Herfra må du hekle videre rundt med isoporhjertet i, ellers får du det ikke inni når du begynner å snevre inn i toppen. Det kan være litt uvant med en gang, men det går veldig greit etterhvert. Bare pass på at du ikke hekler for stramt - da blir det vanskelig å hekle med hjertet i...


Neste omgang hekler du sammen 2 eller 3 masker i hver side.

Tips: Ved felling/hekle to masker sammen: stikk nålen inn i kun de ytterste løkkene av maskene, og hekle en hs som vanlig. Da får du en jevn og neste usynlig felling.  Hekler du med hele masken, blir fellingen mer «klumpete» og synlig.


På de minste hjertene strenger du antagelig bare 1-2 fellinger før du er i toppen, på større hjerter krever det noen flere omganger med felling.


Når har kommet til toppen hekler du 1 hs i hver hs frem til midten av hjertet. Hekle så sammen de to sidene med en  fm som du strammer godt for å få fin fasong på hjertet. Hekle videre sammen de to sidene med fm. 


Når hjertet er lukket på den ene siden, fortsetter du med fm videre rundt hjertet ved å hekle ned mellom to hs i sideøkningen.


Tips: For at kanten rundt skal bli jevn og fin, og stramme litt rundt hjertet, synes jeg det er best å stikke nålen gjennom 2 tråder mellom halvstavene. 


Når du kommer til spissen nederst på hjertet, stikker du nålen inn i hullet i bunnen og hekler en fm. Pass på at du på neste maske kommer på raden med sideøkninger, slik at du kan fortsett med fm oppover langs denne. Da får du en jevn og fin markering av hjerteformen. 

På toppen av hjertet hekler du sammen de to åpne sidene med fastmasker, og fester tråden på midten. Bruk er stoppenål til å feste tråden godt, og evt. stramme litt ekstra i midten slik at hjerteformen blir fint markert. 


Ferdig!!


Hvis du vil kan du nå hekle en liten blomst eller annen pynt til hjertet, feste en tråd til det og henge det opp.  De er likevel aller finest  i all sin enkelhet, synes jeg, hengende på trollhassel eller blomstrende kirsebær/magnolia grener.  Mulighetene er mange!


Jeg håper du får mye glede av dine Lykkehjerter!  


PS: Lager du dette hjertet hadde det vært veldig hyggelig om du la igjen et spor enten her eller tagger meg på Intagram ❤️


❤️ Live - Laugh -  Love ❤️


Strikket poncho med løs hals og pulsvanter

$
0
0


En vindfull og våt dag for noen uker siden hastet jeg forbi garnbutikken, våt og kald og med hastverk etter å komme meg hjem, da jeg nesten snublet over en restekurv med  herlig, chunky garn i de deiligste høstfarger! Jeg fikk en akutt trang til å strikke noe lunt og varm og høstlig - til meg selv, for en gangs skyld!
Dette fantastiske garnet Kidsilk Amore fra Rowan, er nå dessverre ute av sortimentet, så jeg sikret meg de siste 10 nøstene i den nydelige fargekombinasjonen "Chestnut", og i bilen hjem var planleggingen i gang....Hva skulle jeg lage av disse herlighetene?

Det siste jeg trengte var vel et nytt prosjekt, siden jeg har minst 6 UFO'er liggende rundt om kring i kurver og skuffer, men hva kan man gjøre....:-)

Dette er et tykt og deilig garn som må stikkes på pinne 10-12, så lite rekker langt, men da jeg ivrig begynte på en Skappel inspirert lang jakke innså jeg etterhvert at jeg likevel ikke hadde nok.
Det var bare å rekke opp igjen og begynne på nytt, og starte jakten på det perfekte poncho oppskrift i stedet...

Det finnes utrolig mange flotte oppskrifter på poncho, og jeg fant mange jeg kan tenke meg å lage i andre typer garn, men ingen som var helt riktige til dette garnet....

Så da begynte jeg på egenhånd, og lot plagget  bli til underveis....Jeg gikk for en enkel variant i glattstrikk, slik at fargespillet i garnet virkelig fikk komme til sin rett, For å få mine usle 10 nøster til å rekke litt lenger, la jeg inn striper i 3 dobbel Brushed Alpakka Silk, i en fin brun-beige farge som gled rett inn i fargemixen, men som med stukturen i stripene likevel skapte en fin kontrast.


Garnet rakk AKKURAT til en poncho, en løs og god hals og et par pulsvanter. da hadde jeg en ca. 10 cm lang garnstump igjen!!

Jeg er veldig fornøyd med denne ponchoen! Så lett, så varm og  i de vakreste høstfarger.

Nå ønsker Lillemor seg en tilsvarende - bare i lys blå, så er straks i gang med en barneversjon også, tenker jeg..

Vil du strikke deg en tilsvarende følger oppskrift her:

LYKKEPONCHO


Garnforslag: 
Tykt garn for pinne 10-12.
(Drops Eskimo,  Drops Air el. l.)
Drops Brusehd Alpaca Silk til stripene (3 tråder strikket sammen)
Rundpinne (60-80 cm)
Heklenål  5-6 mm
Mål: Hvert rektangel måler ca. 40 x 84 cm
Strikkefasthet: 10 m og 12 pinner = 10x10 cm

Ponchoen er one-size, men størrelsen kan selvsagt tilpasses ved å redusere/øke antall masker i bredden og pinner i lengden. Mål og prøv underveis så du er sikkert på at du får den slik du vil .

Venstre for/bakstykke: 
Omg.1: Legg opp ca. 40 masker på rundpinne nr. 10 og strikk første omgang vrangt rundt.

Omg. 2-6: Strikk  glattstrikk (5 omg. )

Omg. 7:. Skift  til 3 tråder Brushed Alpaka Silk og strikk en omgang vridd rett.

Omg. 8:  Strikk *en rett, en vr* omg. ut. 

Omg. 9: Strikk vridd rett.  

Gjenta rad 2-9 til rektangelet har nådd ønsket lengde. Her ca. 84 cm.


Høyre for/bakstykke: 
Strikk som venstre bakstykke.

Montering: 
Legg oppleggskanten på venstre forstykke mot langsiden på høyre forstykke og sy sammen for hånd fra nederst på oppleggskanten på begge stykkene, og ca. 40 cm oppover. Pass på at sømmen ikke strammer, og at stingene er tett og fine.
Legg så avfellingskanten på høyre bakstykke mot venstre langside og sy sammen på samme måte.

Heklet boblekant:
Langs halsåpningen og rundt hele ponchoen hekles en boblekant med 3 stråder Brushed Alpakka Silk (eller lignende)

Hekle først en rad med fastmasker rundt hele halsåpningen og ponchoen. Pass på at arbeidet ikke strammer og ikke er for løst. Kanten skal være jevn og fin. Snu arbeidet.
Neste omgang skal du hekle fra vrangen på følgende måte:

*1 fm, 1 boble (se forklaring under)* rundt hele åpningen. Avslutt med en kjedemaske i første fastmaske.

På retten vil du nå ha en fin boblekant.

Boblekant: hekle 4 staver i en maske, men ikke trekk igjennom siste masken. Når du har 5 m på nålen, trekkes tråden gjennom alle maskene og avslutt med en kjedemaske for å stramme toppen av boblen.

Se instruksjonsvideo om hvordan du hekler bobler.


LØS HALS


Omg.1: Legg opp 80 masker på rundpinne nr. 10 og strikk første omgang vrangt rundt. 

Omg. 2-6: Strikk  glattstrikk (5 omg. )

Omg. 7:. Skift  til 3 tråder Brushed Alpaka Silk og strikk en omgang vr. rett.

Omg. 8: Strikk *en rett, en vr* omg. ut. 

Omg. 9: Strikk vr. rett, mens du samtidig feller hver 10 maske ved å strikke 2 m. sammen.  

Gjenta omg. 2-9  3 ganger til, slik at du totalt får 4 striper med perlestrikk, og feller hver 10 maske i hver stripe. 

Etter stripe nr. 4 strikkes 4 omganger glattstrikk. Strikk en omgang til, hvor  det felles hver 10 maske. Fell av. 

Heklet boblekant:
Langs halsåpningen og rundt hele ponchoen hekles en boblekant med 3 tråder Brushed Alpakka Silk

Hekle først en rad med fastmasker rundt hele halsåpningen og ponchoen. Pass på at arbeidet ikke strammer og ikke er for løst. Kanten skal være jevn og fin. Snu arbeidet.
Neste omgang skal du hekle fra vrangen på følgende måte:

*1 fm, 1 boble (se forklaring under)* rundt hele åpningen.  Avslutt med en kjedemaske i første fastmaske.

På retten vil du nå ha en fin boblekant.

Boblekant: hekle 4 staver i en maske, men ikke trekk igjennom siste masken. Når du har 5 m på nålen, trekkes tråden gjennom alle maskene og avslutt med en kjedemaske for å stramme toppen av boblen.

Se instruksjonsvideo om hvordan du hekler bobler.


PULSVANTER


Legg opp 18-20  masker på pinne nr. 10. 

Omg.1: Strikk første omgang vr. rundt. 

Omg. 2-6: Strikk  glattstrikk (5 omg. )

Omg. 7:. Skift  til 3 tråder Brushed Alpaka Silk og strikk en omgang vridd rett (vri maskene før du strikker de, slik at stripen blir stram og fin.)

Omg. 8:  Strikk *en rett, en vr* omg. ut. 

Omg. 9: Strikk vridd rett

Gjenta omg. 2-9  en gang, slik at du har to striper. Strikk 5 omganger glattstrikk og fell av.

Sy sammen i  siden, og hekle en boblekant langs toppen.,


Heklet boblekant:
Hekle først en rad med fastmasker langs kanten med 3 tråder Brushed Alpaca Silk. Pass på at arbeidet ikke strammer og ikke er for løst. Kanten skal være jevn og fin. Snu arbeidet.
Neste omgang skal du hekle fra vrangen på følgende måte:

*1 fm, 1 boble (se forklaring under)* rundt hele åpningen.  Avslutt med en kjedemaske i første fastmaske.

På retten vil du nå ha en fin boblekant.

Boblekant: hekle 4 staver i en maske, men ikke trekk igjennom siste masken. Når du har 5 m på nålen, trekkes tråden gjennom alle maskene og avslutt med en kjedemaske for å stramme toppen av boblen.

Se instruksjonsvideo om hvordan du hekler bobler.


Garnet er enda finere når solen skinner på det! Det er små kobberfargede glittertråder i det som virkelig kommer til rett i solskinnet.


Lykke til med poncho strikkingen! Tag meg gjerne hvis du bruker oppskriften min


Live - Laugh - Love

Knitted poncho with cowl and wristwarmers

$
0
0


This chunky and supercomfy poncho is the result of an impulse yarn bargain I made after passing by my local yarn store on my way home from work. 10 soft and beautiful skeins of this amazing yarn was calling on me from the bottom of a 70% off basket outside the store, and there was no way I could resist....

This lovely yarn from Rowan (Kidsilk Amore) is now discontinued, so these 10 skeins was all I could get my hands on..... My dream of a chunky, long cardigan in these warm and autumnal colours was obviously not going to happen, so an armless poncho would have to do!

I searched "everywere" for the perfect pattern, and found so many wonderful ponchos I want to make, but none that was perfect for this yarn, so I had to come up with my own pattern....

I'm really pleased with it, and it is supereasy to knit!

To make the yarn last a little longer, I added some stripes in Brushed Alpaca Silk. This added a nice contrast and structure to it, I think. I also made the edging in this yarn (3 threads, to get it thick enough to match the chunky Rowan yarn )


I had JUST enough yarn for a poncho, a loose and comfy cowl and a pair of writwarmers, so now I'm all set for beautiful and crips Autumn days!

Little Missy now wants a similar in light blue, and who am I to say no to that! I've now made a children's version of this, and she is so happy! I'll post photos and patterns for this later!


I you want to make your own poncho, feel free to use my pattern:

LYKKE PONCHO 


Yarn suggestions: 
Chunky yarn for needles 10-12 (Eur)
(Drops Eskimo, Drops Air el.l..)
Drops Brushed  Alpaca Silk for the stripes (3 threads knitted together)
Circular needles (60-80 cm) size 10 - 12 mm
Crochet hook:  5-6 mm
Measurement: Each rectangel measures approx. 40 x 84 cm
Tension: 10 stiches x 12 rounds = approx. 10x10 cm
Repeat from * to *

Note: This poncho is one-size, and you can adjust the size by adding/reducing the number of stiches and rounds. Measure it and try it on along the way, so you get the size you like.

The poncho is knitted as two identical rectangles and sewn together in the front and back.


LEFT HAND rectangle (back/front): 

Row 1: Cast on 40 stiches on needles 10 mm, and purl the first row

Row 2-6:  Stocking stich  (alternate a knit row with a purl row )

Row 7: Change yarn to 3 threads of Brushed Alpaca Silk and knit into back of stich

Row 8:  Seedstich (moss stich)  *One knit, one purl*  

Row 9: Knit into back of stich

Repeat row 2 -9 until desired length. In this pocnho the total length is 84 cm.

Cast off.


RIGHT HAND rectangle (front/back): 
Knit this the same way as the left hand rectangle (above).


Assembling: 
Stich the hem on the left piece along the long side on the right hand piece, corner to corner and approx 40 cm. Make sure that the stiches are not too tight, and "blends in" to the knitting.
Place the short hem of the right hand piece againt the left long side, and do the sam.

You will now have a v-shaped opening in the front and back, and it is time for the border :-)

I crocheted a simple bobble edging both along the neck and the hem.


Bobble edging:

Use 3 strands of Brushed Alpaca Silk (or similar..) and crochet hook 5 or 6 mm.

Start with a row of sc (US) /  dc (UK) crochet along the hem and close the round with a sl st in the first stich. Make sure it is loose and even, so the ponchos drapes nicely.

Turn your work, and work the next round from the back. (The bobbles will then appear on the front.)

Repeat from *to *:

*1 sc (US) / dc (UK) , 1 bobble (see explanation and video below) * Close the round with a sl in the first sc/dc

You will now have a row of beautiful boobles  on the right side!

Bobble:
Make 4 doubles (UK) / trebles (US), but do not pull the yarn through the last loop, leaving 5 loops on you hook. Pull the yarn through all 5 loop, and close the bobble with a sl st.
Confused?

See this instructionvideo on how to do the the bobble stich  :-)


LOOSE COWL


Row.1:  Cast on 80 stiches on circular needles 10 mm, and purl the first row back and forth (not in the round )

Row 2-6:  Stocking stich  (alternate a knit row with a purl row )

Row 7: Change yarn to 3 threads of Brushed Alpaca Silk and knit into back of stich

Row 8:  Seedstich (moss stich)  *One knit, one purl*  

Row 9: Knit into back of stich

Repeat row 2 -9  x 3 , but in every seedstich row, you have to knit 2 stiches together approx. every 10th stich. Now you have 4 stripes in Brushed Silk Alpaca.

After the 4th stripe, knit 5 rows of stocking stich (alternate a knit row with a purl row ). I the last (5th) row, knit 2 stiches together approx. every 10t stich.

Cast off.

Sew the two sides together, and make the same booble edgings on the top and bottom hem, like on the poncho (see above)

Finished!


CHUNKY WRISTWARMERS

Row.1:  Cast on 18-20 stiches (measure your wrist, and adjust the number of stiches to fit you!) on needles 10 mm, and purl the first row back and forth (not in the round )

Row 2-6:  Stocking stich  (alternate a knit row with a purl row )

Row 7: Change yarn to 3 threads of Brushed Alpaca Silk and knit into back of stich

Row 8:  Seedstich (moss stich)  *One knit, one purl*  

Row 9: Knit into back of stich

Repeat from *to * once. You now have 2 stripes. Knit 5 rows off stocking stich, and cast off. 

Sew the two sides together, and crochet a booble edge along the top.

Finished!


.


Thes colours really come out in the sunshine. There's tiny copper threads in the yarn, and you can see them glitter in the sun!


Happy knitting!


Live - Laugh - Love

The #rusticlacesquare trinn for trinn

$
0
0


Jeg regner med flere av dere for leeenge siden har fått med dere denne nydelige hekleruten i diverse sosiale medier det siste året, og flere har helt sikkert allerede heklet både en og flere av denne. 

Historien rundt dette nydelige designet er et fascinerende eksempel på hvilken kraft det kan være i sosiale medier. 

Dette designet er altså IKKE laget av meg, og dessverre har det ikke lykkes enda å spore opp hvem som i sin tid designet denne ruten, som på Instagram har fått navnet #rusticlacesquare , etter bloggeren og IG profilen Magda de Lange (Dubai) Hun kaller seg rawrustic på Instagram , og har den fine bloggen  Pigtails . Magda var en av de første som publiserte denne ruten på Instagram, etter å ha sett den hos Cornel Strydom . (Sør-Afrika) Dette var allerede i desember i fjor, og siden det har ruten gått sin seiersgang verden rundt. Da Susan (California) publiserte diagrammet på sin IG konto i april tok det helt av, og "alle" ville lage denne ruten.

Tilfeldigvis oppdaget jeg også at den superflinke og inspirerende Marit K. Skjong (@maritparit ) hadde delt et bilde av en nydelig, gammel heklet duk hun hadde kjøpt i en bruktbutikk på Nord-Vestlandet - mønsteret var altså denne fine ruten!  Dette bildet ble delt noen uker før designet dukket opp i Sør-Afrika og Dubai, så her har nok universets krefter spilt inn, godt hjulpet av mektige sosiale medier. En morsom historie er det i alle fall. 

Flere instagrammere har engasjert seg i den "globale jakten" på designeren, og så vidt jeg vet er designet nå sporet tilbake til en heklebok utgitt av Allers i Sverige (og antagelig også i Norge) på 80-tallet, samt en tilsvarende bok utgitt i Argentina (?) omtrent på samme tid. Dette er altså et gammelt design, som nå har fått nytt liv fordi noen dyktige og kreative damer publiserte det på Instagram. Nå hekles den rundt om i "hele" verden, og søker du på #rusticlacesquare på Instagram eller Google vil du få opp utrolig mange flotte varianter. 

Hvor finnes mønsteret? 

Diagrammet til denne ruten ble altså postet på Instagram, og finnes også under #rusticlacasquare, i tillegg til flere varianter på Pinterest. Jeg vet ikke hvor dette diagrammet opprinnelig kom fra.  Det er bare et diagram, uten noen andre instruksjoner, så dersom man ikke er komfortabel med å lese heklediagrammer, blir det vanskelig å lage denne ruten. 

Etter at jeg omsider ga opp å stå imot, og til slutt bare MÅTTE prøve dette nydelige designet, fikk jeg mange spørsmål på Instagram om hvor man kunne finne mønster. Siden flere ble skuffet over at det kun finnes som diagram, tenkte jeg at en trinn for trinn beskrivelse hadde vært supert, slik at flere hekleglade kan få prøve seg. Det var slik jeg selv lærte meg å hekle for et par år siden, og jeg var da evig takknemlig for alle de flinke bloggerne som generøst delte mønster og fremgangsmåte. 

Det som altså er litt spesielt her, og som har gjort at jeg ha nølt lenge med å legge dette ut offentlig, er at designet altså IKKE er mitt, og jeg har ingen å kreditere for det. Jeg er derfor usikker på om jeg bryter noen Copyright regler ved å publisere dette....Nå har imidlertid den flinke bloggeren  Crochetandteaparty lagt ut skriftlig mønster på denne, så da tenker jeg at det er OK om jeg viser dere min trinn-for-trinn beskrivelse....

Siden dette åpenbart er et gammelt design, og mye allerede er prøvd for å finne frem til rette opphav, velger jeg altså å publisere dette. Dersom noe som leser dette vet noe om hvem som kan ha designet dette, blir jeg veldig glad for å høre om det. 

Jeg håper vi etterhvert klarer å finne frem til opphavet av denne ruten, slik at vi kan ære den som æres bør! 

Her er i alle fall min tolkning av diagrammet i en trinn-for-trinn beskrivelse. 

Diagrammet kan du altså kan finne bl.a her og her

Noen små justeringer har jeg gjort, men resultatet blir så godt som det samme. 

Jeg håper du får stor glede av dette flotte designet, og dersom du velger å dele det du lager på sosiale medier, husk å merke det  #rusticlacesquare . Det er utrolig gøy å se alle de forskjellige variantene 
som finnes der ute i verden! 


The Rustic Lace Square

Forkortelser: 
m = maske
lm = luftmasker Se instruksjonsvideo her
fm = fastmasker Se instruksjonsvideo her
kjm = kjedemaske Se instruksjonsvideo her
halvst. = halvstav. Se instruksjonsvideo her
st  = stav. Se instruksjonsvideo her
dobbel stav: Se instruksjonvideo her
cluster: her: 5 staver heklet sammen. Se instruksjonvideo her (merk at denne viser kun 3 halvstaver sammen, men prinsippet er det samme)
magisk sirkel: Se instruksjonsvideo her


Gjenta det som står mellom * og *


Lykke til!


Runde 1: 

Lag en «magisk sirkel» i farge 1, og hekle 5 lm (fungerer som første stav ringen) *hekle 1 st., 2 lm* 7 ganger. Fest med en kjm  i tredje  lm. Du har nå totalt 8 st, med 2 lm mellom hver stav. Stram ringen godt, slik at hullet i midten blir tett. 


Runde 2: 

Skift til farge 2 og fest tråden i et av mellomrommene mlm stavene. Hekle 3 lm (fungerer som første stav i omg.) *hekle 1 st i neste st, 3 st i lm buen*  x 7.  1 st i neste st og 2 st i lm buen. Fest med kjm  i tredje lm. Fest tråden. Totalt 32 st.


Runde 3: 

Skift til farge 3 og fest tråden i hvilken som helst st. Hekle 3 lm (fungerer som første st. i omg.), 4 st i de neste st.,  2  lm, 1 st. i samme m som forrige (1 st i neste st) x 4,  3 lm*  x 8. Avslutt med 1 kjm i tredje lm.  Fest tråden. Totalt 8 grupper med 5 staver.


Runde 4:

Skift til farge 4 og fest tråden i første st. i en av 5 st gruppene. Hekle 3 lm og fortsett med 4 staver uten å trekke tråden gjennom siste masken. Når du har 5 m på nålen trekker du tråden gjennom alle maskene og strammer godt. Avslutt med 1 lm. = 1 cluster,*3lm, 1 st. i  lm buen, 2lm, 1 st I samme lm bue, 3 lm, 1 cluster med 5 st. (1 st i hver st, trekk sammen til slutt, 3 lm* 7 ganger. 3 lm, 1 st i lm buen, 2 lm, 1 st. lm buen, 3 lm. Avslutt med 1 kjm i tredje lm.  Fest tråden. Totalt 8 cluster og 8 «v-er» i lm buene. 


Runde 5: 

Skift til farge 1. Fest tråden i første st. i en v-ene i  lm buene. Hekle 5 lm, 1 st i samme m. Hopp over 2 m, 1 st. i neste st,  2 lm, 1 st i samme m. * 3 lm, hopp over 6 m (lm + puffstich) , 5 st. i neste lm bue («V»), 3 lm, 5 st. i samme lm bue, 3 lm, hopp over 6 m, 1 st. i neste st, 2 lm, 1 st. i samme m, hopp over 2 lm, 1 st.i neste st., 2 lm, 1 st. i samme m*3 ganger.  3 lm, hopp over 6 m (lm + puffstich) , 5 st. i neste lm bue («V»), 3 lm, 5 st. i samme lm bue, 3 lm, hopp over 6 m og fest med 1 kjm i 3. lm.


Runde 6: 

*5 lm, 1 st. i samme m. Hopp over 2 m, 1 st. i neste st, 2 lm, 1 st i samme m, hopp over 2 m, 1 st. i neste st, 2 lm, 1 st. i samme m, 3lm, Et 5 st. cluster  i de neste 5 st, 5 st. i 3-lm buen, et 5-st. cluster i de neste 5 st., 3 lm* 4 ganger. Fest med 1 kjm i 3. lm.


Runde 7: 

*5 lm, 1 st. i samme m. Hopp over 2 m, 1 st. i neste st, 2 lm, 1 st i samme m, hopp over 2 m, 1 st. i neste st, 2 lm, 1 st. i samme m, hopp over 2 lm, 1 st. i neste st, 2 lm, 1 st. i samme st, 8 lm, 1 5.st. cluster i de neste 5 st., 8 lm* 4 ganger.  Fest med 1 kjm i 3. lm.


Runde 8: 

*5 lm, 1 st. i samme m. Hopp over 2 m, 1 st. i neste st, 2 lm, 1 st i samme m, hopp over 2 m, 1 st. i neste st, 2 lm, 1 st. i samme m, hopp over 2 lm, 1 st. i neste st, 2 lm, 1 st. i samme st. Hopp over 2 m, 1 st. i neste st., 2 lm, 1 st. i samme m, 3 lm, 1 fm i 3.lm i 8-lm buen, 8 lm, 1 dobbel stav i toppen av 5 st cluster, 8 lm, 1 fm i 5 m i 8-lm buen. 3 lm. * 4 ganger. Fest med 1 kjm i 3. lm.


Runde 9: 

*5 lm, 1 st. i samme m. Hopp over 2 m, 1 st. i neste st, 2 lm, 1 st i samme m, hopp over 2 m, 1 st. i neste st, 2 lm, 1 st. i samme m, hopp over 2 lm, 1 st. i neste st, 2 lm, 1 st. i samme st. Hopp over 2 m, 1 st. i neste st., 2 lm, 1 st. i samme m, hoppe over 2 m, 1 st i neste st, 2 lm, 1 st i samme m, 1 lm, 9 st. i 8-lm buen, 1 st. i neste dbl stl., 9lm, 1 st. i samme m som forrige, 9 st. i 8-lm buen, 1 lm* 4 ganger.  Fest med 1 kjm i 3 lm. Ferdig! 


Denne ruten trenger mest sannsynlig å blokkes (der kommer litt an på hvilken garnkvalitet du bruker) for at mønsteret virkelig skal komme til sin rett. Under er den ferdige ruten før blokking.....


...og her er den fiks ferdig - etter blokking:


Live - Laugh - Love


The Rustic Lace Square - pattern and tutorial

$
0
0

Norwegian version here


I recon most of you have already seen this beautiful "mystery" square featured in multiple social medias during the last year, and so many of you have made this already. 

I came pretty late to the "rustic lace" party myself, and made my first square just a few months ago, first of all to find out for myself what all the fuzz was about...
Needless to say, I was hooked from the first square, and fell under the "Rustic Lace Square spell" like so many others...

Many attempts have been made, by many people,  to trace the original designer of this pattern, with no success so far, and the story behind this square is a fascinating example of the power of social media. 

The name "The Rustic Lace Square" was "invented" by  Susan, and  is dedicated the talented blogger and IG profile Magda de Lange (Dubai). She calls herself  rawrustic on Instagram, and also has a blog called Pigtails . Magda was one of the first to feature this sqaure on Instagram, after being inspired by a blanket made by Cornel Strydom  (South.Africa).This was in December 2014, and since then this square has wandered across the globe. When  Susan (California) published the diagram on her IG profile in April, and also created the #rusticlacesqaure, it's success was a fact!
 "Everybody" in the crafting community on Instagram had to try this beautiful sqaure. 

By coinsidence, when browsing the beautiful IG gallery of the supertalented and inspiring Marit K. Skjong @maritparit,  I found this beautiful photo from October 2014 of an old tablecloth she had found in a local second-hand store on the west coast of Norway. The pattern was this mystery square!! It is so strange how the dots all connect, and how this old pattern pops up in so many different forms in so many different countries almost at the same time!

Many instagramers have participated in the global search for the original designer, and as far as I know, the design is now traced back to an old crochet book published by the mediahouse Allers in Sweden (and probably also in Norway) in the early 80-ies, and in a similar book in Argentina (?) from about the same period. It was probably a vintage design even in the 80-ies, and the name of the original designer is nowhere to be found. 

Where can you find the pattern?

Social Media had now "taken control" of this, and the diagram and even written instructions are now available for free both on Instagram and on Ravelry. 
If you look up  #rusticlacasquare, you will find many beautiful versions of this square, in addition to the diagram. The same goes for Pinterest

After I published a photo of this sqaure on my IG account, I got so many requests for a tutorial and pattern, but since this is not my design, I hesitated on publishing a tutorial for this. 
When I first taught myself to crochet a few years ago, I learned so much from Youtube and generous bloggers who published step-by-step tutorials. I could not read a diagram, and written instructions without photos were just confusing to me. I'm a very visual learner!.
I now know how to read diagrams, so this sqaure was fearly easy for me now, but a few years back it would have been such a challenge!

I therefore made a step-by-step photo tutorial a few months back,but was not sure wether I could or should publish it. Since then, so much is done trying to find the rightful "owner" to credit, and many others have now alrady published both the diagram and instructions, so I have decided to publish thw tutorial - for all you "visual learners" out there! 

This is my interpretation of the pattern, and if any of you who reads this knows more about this sqaure and the original designer, please let me know, so I can give credit where credit is due!

I hope you will enjoy making this wonderful design, and if you choose to share your makes in social media, please use the tag #rusticlacesquare . It is so wonderful to see all the different versions out there!


The Rustic Lace Square 


A step-by step tutorial


Note: the tutorial is written in US terminology. Below are the terms in both US and UK versions.


US terms


UK terms

sl st slip stichscsingle crochet
scsingle crochetdcdouble crochet
hdchalf double crochethtrhalf treble crochet
dcdouble crochettrtreble crochet
trtreble crochetdtrdouble treble crochet
dtrdouble treble crochettrip tr/trtrtriple treble crochet
rev screverse single crochetrev dcreverse double crochet
yo yarn overyoh  yarn over hook


Repeat directions between * and * 

Round 1:

Make a magic circle, and ch 5 (counts as 1 dc, ch 2) * 1 dc in the ring, ch 2* x 7. Sl st in 3rd st of beg ch to join. 


Round 2:


Join new colour with a sl st in one of the  ch-2 sp. Ch 3 (counts as 1 dc) * 1 dc in next st, 3 dc in 2-ch sp* x 7, 1 dc in next st, 1 dc in 3-ch sp, sl st in 3rd st of beg. ch to join. 


Round 3: 

Join new colour anywhere on the circle. Ch 3 (counts as 1 dc), * 1 dc in each of next 4 sts, ch 2, 1 dc in same st as last dc.* x 8. Join with sl st in 3rd st of beg. ch to join.


Round 4: 

Join new colour in the first dc in a 5-dc group. ch 3 (counts as 1 dc) 1 dc in the next 4 sts, but do not pull through the last loop of the dcs. When you have 5 sts on the needle, pull the yarn through all the loops, and you have a ch-5 cluster *( ch 3, 1 dc, ch 2, 1 dc, ch 3) in next. 3-ch sp,  5-ch cluster over next 5 sts. * x 7. ( ch 3, 1 dc, ch 2, 1 dc, ch 3) in next. 3-ch sp. Sl. st in 3rd st of beg. ch to join. 


Round 5: 

Join new colour into first dc. Ch 5, 1 dc in same st., skip 2, 1 dc in next st, ch 2, 1 dc in same st. *ch 3, skip 6 (ch + 5-ch cl), (5 dc, ch 3, 5 dc) in the next 2-ch sp, ch 3, skip 6, (1 dc in next dc, ch 2, 1 dc ) in same st, skip 2, (1 dc in next st, ch 2, 1 dc ) in same st. * x 3. Ch 3, skip 6 (1 ch + 5-ch cl),( 5 dc, ch 3, 5 dc ) in next 2-ch sp, ch 3, skip 6, sl st in 3rd ch of beg. ch to join.


Round 6:

Ch 5, 1 dc in same st, skip 2, (1 dc, ch 2, 1 dc) in next 2-ch sp, skip 2, (1 dc, ch 2, 1 dc) in next st, *ch 3, 5-ch cl in the next 5 st, ch 3, 5 dc in 3-ch sp, ch 3, 5- dc cl in next 5 st, ch 3,(1 dc, ch 2, 1 dc) in next st, skip 2, (1 dc, ch 2, 1 dc) in next 2-ch sp, skip 2,(1 dc, ch 2, 1 dc) in next st * x 3, ch 3, 5-ch cl in the next 5 st, ch 3, 5 dc in 3-ch sp, ch 3.  Sl st in 3rd st of beg. ch to join.


Round 7: 

Ch 5, 1 dc in same st, skip 2, (1 dc, ch 2, 1 dc) in next 2-ch sp, skip 2, (1 dc, ch 2, 1 dc) in next 2-ch sp, skip 2,(1 dc, ch 2, 1 dc) in next st , * ch 8, skip 7, 5-ch cl in next 5 st, ch 8,skip 7 (1 dc, ch 2, 1 dc) in next st, skip 2,   (1 dc, ch 2, 1 dc) in next 2-ch sp, skip 2, (1 dc, ch 2, 1 dc) in next 2-ch sp, skip 2,(1 dc, ch 2, 1 dc) in next st,* x 3. Ch 8, skip 7, 5-ch cl in next 5 st, ch 8, skip 7.  Sl st in 3rd st of beg. ch to join.


Round 8: 

Ch 5, 1 dc in same st, skip 2, (1 dc, ch 2, 1 dc) in next 2-ch sp, skip 2, (1 dc, ch 2, 1 dc) in next 2-ch sp, skip 2,(1 dc, ch 2, 1 dc) in next 2-ch sp, skip 2, (1 dc, ch 2, 1 dc) in next st ,* ch 3, 1 sc in 3rd st of 8-ch sp, ch 8,  1 dtr in 5-ch cl, ch 8, 1 sc in 5th st of 8-ch sp, ch 3,(1 dc, ch 2, 1 dc) in next st , skip 2,  (1 dc, ch 2, 1 dc) in next 2-ch sp, skip 2, (1 dc, ch 2, 1 dc) in next 2-ch sp, skip 2,(1 dc, ch 2, 1 dc) in next 2-ch sp, skip 2, (1 dc, ch 2, 1 dc) in next st  *x 3. Ch 3, 1 sc in 3rd st of 8-ch sp, ch 8,  1 dtr in 5-ch cl, ch 8, 1 sc in 5th st of 8-ch sp, ch 3. Sl st in 3rd st of beg. ch to join.     


Round 9: 

Ch 5, 1 dc in same st, skip 2, (1 dc, ch 2, 1 dc) in next 2-ch sp, skip 2, (1 dc, ch 2, 1 dc) in next 2-ch sp, skip 2,(1 dc, ch 2, 1 dc) in next 2-ch sp, skip 2, (1 dc, ch 2, 1 dc) in next 2-ch sp, skip 2, (1 dc, ch 2, 1 dc) in next st, * ch 1, 9 dc in 8-ch sp, 1 dc in next dtr, ch 9, 1 dc in same st, 9 dc in 8-ch sp, ch 1, (1 dc, ch 2, 1 dc) in next st, skip 2, (1 dc, ch 2, 1 dc) in next 2-ch sp, skip 2, (1 dc, ch 2, 1 dc) in next 2-ch sp, skip 2,(1 dc, ch 2, 1 dc) in next 2-ch sp, skip 2, (1 dc, ch 2, 1 dc) in next 2-ch sp, skip 2, (1 dc, ch 2, 1 dc) in next st*  x 3. Ch 1, 9 dc in 8-ch sp, 1 dc in next dtr, ch 9, 1 dc in same st, 9 dc in 8-ch sp, ch 1Sl st in 3rd st of beg. ch to join.     


All done, and ready for blocking. 


Tah-da! The Rustic Lace Square  - all blocked and beautiful ❤️


I hope you've enjoyed this tutorial! All feedback and/or corrections are highly welcome! 

Don't forget to tag you photos with #rusticlacesquare!

Live - Laugh - Love


Tulip Easter Egg

$
0
0


Hi friends - long time no blogging! 


Times are busy, but with longer and lighter days, and promises of spring, my crochet and blogging mojo is starting to come back, and I figured that a little spring/easter inspired post was in order.

When I posted a photo of these cute tulip-eggs on Instagram last Easter, the response was overwhelming! 
It quickly became one of my most liked photos, and so many of my instafriends asked for a pattern. 
Unfortunately I did not have the time then to write up a pattern and take photos for a tutorial. I'm sorry about that! I'm not a professional designer, and crafting and blogging are only my hobbies (that I have far too little time to endulge in.....)

But now I have finally managed to shoot some pics of the process, and write up a simple tutorial for you!  I hope you will enjoy it - and I'd love to see you finished tulip-eggs either here on the blog or on Instagram. 


You will need


Eggs  of plastic og styrofoam. I bought this lovely box with 12  plastic eggs from Panduro
Cotton yarn in 3 different colours of your choice.
Crochet hook 2,5 mm
Tapestry needle to fasten ends

This tutorial is vere "loose", as it may vary a lot what size of eggs you use. This is only to show you how to make them, and I trust you to adjust the increase/descrease according to the egg you use. 


Round 1: 

Start with colour 1, and make a magic circle of 6 sc, or chain 6 and make a ring. I prefer the magic circe because it closes the circle competely.


Round 2:

2 htr i each sc around. Total of 12 htr. Put a stichmarker at the beginning of round. 


Round 3:

2 htr in each htr. Total of 24 htrs.

Round 4 and 5 : 

*2 htr, 1 htr, 2 htr* Repeat around. 

Round 6-7: 

1 htr in each htr around.  


Round 8: 

Change to colour 2  * htr, ch 1, htr, skip 2 stc" repeat round. End round with sl st in first htr. 


Tip:fasten the ends on the inside at this stage - it is very hard to do when you close up the egg...


    Round 9: 

    Change to colour 3 with a sl st in 1 ch space between the htr. 


With colour 3, ch 3, skip first dc, * Cl in next ch-1 space, ch 2; repeat from * to last ch-1 space; Cl in last ch-1 space, dc in top of ch-3 changing to colour1. 

Cl (cluster) =[yo and draw up a loop, yo and draw through 2 loops on hook] 3 times all in same space, yo and draw through all 4 loops on hook.


Check that your tulips fits snuggly around the egg.


Round 10: 

Change back to colour 1, and make 4 htr in in each ch-2 space. 


Round 11 - 14 : 

Continue with htr around the egg, and decrease by crocheting 2 stiches together in front loop only approx. every  2. stich around. Put the egg in place, and work tightly around it, adjusting it to the size of the egg.
(How much you'll have to decrease will probably vary a lot from the different egg-sizes, so the instructions are very loose here....)


Last round:

Close the egg with a sl st, and chain a loop for hanging. Fasten the end of the chain with a sl st, and you egg is ready! 


I hope you will enjoy this little tutorial, and make lots of colourful tulip-eggs! 


Until next time: 

Live - Love - Laugh


Daisy Mandala parade...

$
0
0


I LOVE daisies, and those of you who follow me onInstagram, know that I lately have "suffered" from a Daisy Mandala hang-up...

There are so many beautiful mandalas out there in Blogland, and they seemed so much fun to make, so during our lovely Easter vacation I started to experiment with some patterns and colours, and finally made my first mandala!

I call this The Daisy Mandala, and I have worked for weeks now on a pattern and step-by-step tutorial, in case any of you would like to have a go at it.
I just have waaay too few hours in the day, so this project is dragging out, but I'm hoping it will be ready to be "published" very soon...

Anyway, here is a little mandala parade, with my attempts so far, and I promise I'll be back with the pattern!


                                            ❤️Live-Love-Laugh❤️


Latest Images